نحوه حذف NSX VIBS از هاست ESXi
Category : دستهبندی نشده
نحوه حذف NSX VIBS از هاست ESXi
As we already discussed many times, Job of vSphere Administrators is not so limited to GUI. You should be always available with troubleshoot your issues from command line or CLI.This also applies ,when you are dealing with VMware NSX. We have already discussed about manually installing NSX VIBS from CLI of ESXi host. There are some situation that the installation or Uninstallation of NSX VIB’s may fail due to some reason and we as vSphere admin should have to troubleshoot and fix the installation/Uninstallation issues. I have faced one of the issue, when i try to uninstall the NSX components from vSphere Web Client. Let’s take a detailed look at step by step procedure to manually remove NSX VIBs on the ESXi host.
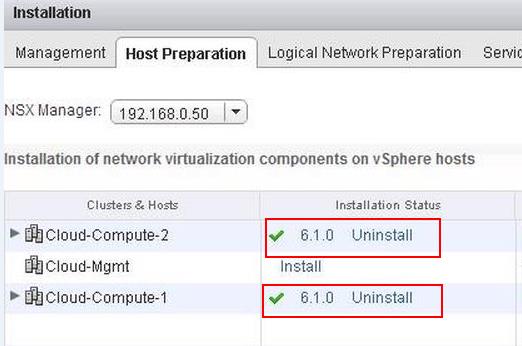
You can UnPrepare the Host/Cluster from vSphere Web Client -> Network & Security -> Installation ->Host Preparation -> Click on UnInstall to unprepare/ Uninstall the NSX VIBs from ESXi host.
 Sometimes, The Uninstall step may get failed due to some communication issues. We should also be ready to manually remove the NSX VIBs installed on the ESXi host from Command Line. There are 3 VIBs related to NSX which we need to remove from the ESXi host.
- esx-vxlan
- esx-vsip
- esx-dvfilter-switch-security
One VIB enables the layer 2 VXLAN functionality, another VIB enables the distributed router, and the final VIB enables the distributed firewall.
Manually Remove NSX VIBs from ESXi Host:
Move your running Virtual Machines to differet host in the Cluster using vMotion. Place your ESXi Host into Maintenance Mode.
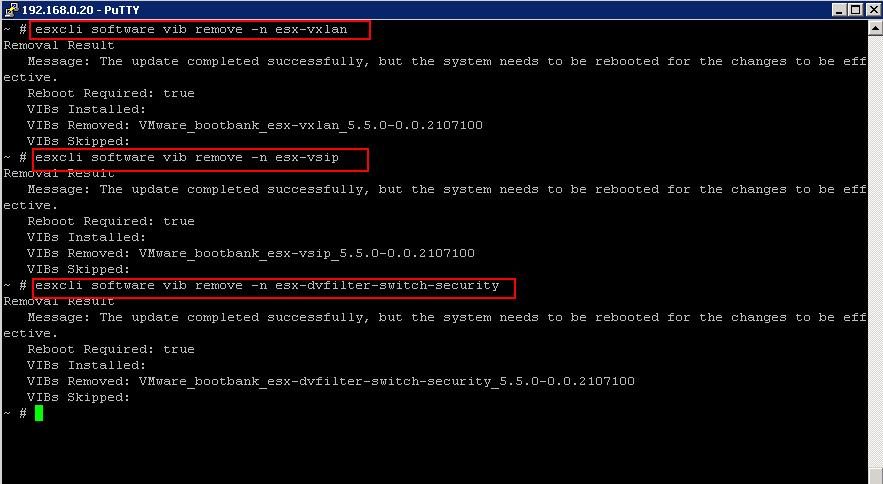
To remove the “esx-vxlan” VIB , execute the below command:
esxcli software vib remove -n esx-vxlan
To remove the “esx-vsip” VIB , execute the below command:
esxcli software vib remove -n esx-vsip
To remove the “esx-dvfilter-switch-security” VIB , execute the below command:
esxcli software vib remove -n esx-dvfilter-switch-security
 Once you have removed all the 3 NSX VIBs, Reboot the ESXi host for the Changes to take effect. I hope this is informative for you. Thanks for Reading !!!. Be Social and share it in social media, if you feel worth sharing it.
Other VMware NSX Related Posts:
VMware NSX Installation Part 1 – NSX Overview & Installation Prerequistes
VMware NSX Installation Part 2 – NSX Lab Design & Deploying NSX Manager
VMware NSX Installation Part 3 – Integrating NSX Manager with vCenter Server
VMware NSX Installation Part 4 – Deploying NSX Controller
VMware NSX Installation Part 5 – Checking NSX Controller Status
VMware NSX Installation Part 6 – Preparing Cluster and Hosts for NSX
VMware NSX Installation Part 7 – Verify NSX VIBs Installation from ESXi hosts
VMware NSX Installation Part 8 – Configuring VXLAN on the ESXi Hosts
VMware NSX Installation Part 9 -Create Segment ID and Transport Zones
VMware NSX Installation Part 10 – Create NSX Logical Switch
VMware NSX Installation Part 11 – Creating Distributed Logical Router
VMware NSX – Backup & Restore VMware NSX Manager Data
VMware NSX – Unable to Delete/Remove NSX Logical Switch
VMware NSX – How to Manually Install NSX VIBS on ESXi Host
VMware NSX – How to Manually Remove NSX VIBs from ESXi Host?
How to Remove NSX (Network & Security) Extension from vSphere Web Client
