Category Archives: تجهیزات HP

  • 0

دوره آموزشی HP APS Server

دوره آموزشی HP APS Server

نام دوره: Servicing HP Proliant APS ML/DL/SL Servers

مدت دوره: 40 ساعت 

HP-Servicing-Proliant-ML-DL-SL-Servers-دوره-آموزشی-سرور

سیلابس دوره آموزشی

Module 1: Configuring ProLiant Server and Array Hardware
Objectives
Firmware upgrade process
Configuring HP ProLiant server
DDR3 memory specifications and configuration rules
Configuring storage subsystem
Learning check
Module 2: Installing Server Support Software
Objectives
HP Insight Control management suites
SmartStart
ProLiant Support Pack
Validating and testing the solution
Setup differences for 100-series ProLiant servers
Learning check
Module 3: Use and Maintain Integrated Lights-Out Products
Objectives
HP Lights-Out technology and benefits
Functions of iLO3 Management processor
Functions of iLO2 Management processor
Learning check
Module 4: Storage Solutions for ProLiant Servers
Objectives
Storage technologies
HP disk drives
HP ProLiant Array controllers
Storage solutions
Learning check
Module 5: Data Availability and Protection for a ProLiant Server
Objectives
Increasing availability through power protection
Rack options
Memory protection technologies
Disk Backup System
Learning check
Module 6: Troubleshooting ProLiant Motherboards
Objectives
Server Boot process
Boot process failure indicators
Troubleshooting reboot problems
Learning check

 ثبت نام دوره آموزشی امنیت CEH


  • 0

استوریج HP 3PAR StoreServ 7000 Storage

 استوریج-HP-3PAR-StoreServ-7000-Storage

Have budget constraints forced you to settle for midrange storage with compromised performance and scalability? Is managing your storage taking up more and more time while delivering diminishing returns? The gold standard platform for Tier-1 storage has extended its offerings—delivering effortless, efficient, bulletproof, and future-proof storage for the entire midrange. HP 3PAR StoreServ 7000 Storage delivers the same industry-leading architecture chosen by 3 out of 4 of the world’s largest managed service providers (MSPs) with pricing that makes compromises a thing of the past.

Store all your data on a single system that supports advanced features including storage federation and automated tiering that enable you to start small and grow without disruption. Make storage effortless with models that give you a range of options that support true convergence of block and file protocols, all-flash array performance, and the use of solid-state drives (SSDs) tiered with spinning media.

What’s new

  • HP 3PAR File Persona Software Suite delivers a tightly integrated, converged solution for provisioning block storage volumes as well as file shares from a single capacity store
  • HP 3PAR Thin Deduplication with patented Express Indexing increases capacity efficiency, protects flash performance, and extends flash life span to make your SSD tier more cost-efficient
  • HP 3PAR StoreServ Management Console provides a modern look and consistent feel for all HP 3PAR StoreServ arrays, making management effortless
  • HP 3PAR Online Import now supports an effortless migration path to 3PAR StoreServ Storage from EMC Symmetrix VMAX as well as existing support for EMC CLARiiON CX4, EMC VNX, and HP EVA
  • Support for VMware Virtual Volumes (VVOLs) enables granular VM-level storage control, disaster recovery, and quality of service in VMware environments with VMware vSphere6
  • New 600 GB 15k FIPS encrypted HDD

Features

Grow with Freedom in any Direction

One architecture and a single stack from midrange to high end.

Meet converged block, file, and object access.

Ease data migration with storage federation software.

Affordable entry pricing and non-disruptive scalability to four nodes.

Get Tier-1 Features, “Six-nines” Availability, and Data Mobility at a Midrange Price

Automated DR configuration protects your data with one step.

Mixed workload support increases consolidation opportunities.

Persistent technologies deliver high availability and Tier-1 resiliency.

Industry-leading thin technologies cut capacity requirements by up to 75 percent.

Automated sub-volume tiering optimizes service levels and reduces costs.

Simple to Install, Own, and Upgrade

Software suites simplify purchasing and lower costs.

HP 3PAR SmartStart and HP 3PAR Rapid Provisioning get you up and running in minutes.

Reconfigurable in just seconds without disruption.

Shares a single, simple management console with all HP 3PAR StoreServ Storage.

Manage Block, File, and Object access from a single interface for maximum agility.


استوریج HP 3PAR StoreServ 10000 Storage

استوریج HP 3PAR StoreServ 10000 Storage

سری HPE 3PAR 10000 یکی دیگر از محصولات SAN Storage است که از استاندارد پلاتینیوم برای استفاده از enterprise Tier 1 storage بهره می بردو برای کاربریهای Enterprise و برای کاربریهای Hybrid private cloud و ITaaS مورد استفاده قرار میگیرد و دارای پورت های پر سرعت فیبر نوری16GB/s است و بسته به مدل آن از 48 تا 96 عدد پورت فیبر نوری 16Gb/s در اختیار می گذارد. این محصول برای مجازی سازی بسیاری ایده آل بوده و آنرا به گزینه های بسیار مطلوب و قابل اطمینان تبدیل کرده است و با تکنولوژیهای به کار رفته در آن باعث کاهش 50 درصدی هزینه های اجرایی san storage می شود.
حداکثر فضای ذخیره سازی آن به صورت Raw Capacity نیز بسته به مدل انتخابی از 1600TB تا 3200TB است.
سری HPE 3PAR 10000 دارای 2 مدل به نام های 10400,10800 است که در جدول زیر به بررسی کاملتر این مدلها می پردازیم:

HPE PAR StoreServ 10000 Storage

HPE PAR StoreServ 10000 Storage2


NOTE: Support for SAS drives on HPE 3PAR StoreServ 10000 Storage is currently available with HPE 3PAR OS version 3.1.2 and later versions.
NOTE: Native FCoE support is available only for limited host configurations. Please check with your regional manager for more details
NOTE: A dedicated CNA is required for FCoE host connectivity
NOTE: The 1600TB and 3200 TB maximum raw capacity limits for the HPE 3PAR StoreServ 10400 and 10800 Storage respectively are applicable only to systems running HPE 3PAR OS version 3.1.3 or later
NOTE: Specifications are subject to change without notice
1- Each port is full bandwidth 8 Gbit/s or 16 Gbit/s Fibre Channel capable as aplicable
2- Recommended minimum is 32 drives which results in a 9.6 TB minimum raw capacity.
3- Maximum raw capacity currently supported with any and all drive types
4- For storage capacity, 1 GiB = 230bytes and 1 TiB = 1,024 GiB
5- RAID MP is HPE 3PAR Fast RAID 6 Technology
6- SSDs are Solid State Drives
7- SAS drives are Serial Access SCSI Drives
8- NL drives are Nearline (7.2k) disks
9- Recommended minimum is 4 drive chassis per pair of controller nodes
10- Each port is full bandwidth 10 Gbit/s iSCSI capable
11- Each port is full bandwidth 10 Gbit/s FCoE capable
12- Applies to the array storage assigned to 3PAR StoreServ File Controller for file services
13- For details, please refer to the 3PAR StoreServ File Controller v2 section in this document
14- Two built-in 1-GbE RCIP ports per node pair; maximum of 8 usable; RCFC works out of the FC Host ports


  • 0

بوت کردن سرور HP با فلش حاوی HP Smartstart

با توجه به اینکه درخواستهای بسیار زیادی از دوستان برای قرار دادن این پست شده بود تیم فنی و مهندسی وی سنتر تصمیم به قرار دادن این پست گرفت.

امیدواریم از این پست لذت ببرید.

Had long wanted to put this post, simplon thing as above, but many times we find (by saving issues) HP servers without CD, so before installing the operating system need to update the firmware on all components of the server with the HP Firmware Maintenance CD and later with the HP SmartStart CD prepare boot, install utilities and drivers from HP on the machine. In the case of not having a CD server can with an HP utility dump them to an external USB or flash drive.

The tool is called HP USB Key Utility, you can download from the official website HP. After downloading can install or remove it to run directly.

With this tool you can transfer images from CD-ROM or DVD-ROM drive to USB (pendrive).

We note that the minimum version is the 7.50 for both HP SmartStart CD cómo HP Firmware Maintenance CD.

Simply select CD / DVD USB drive origin and destination indicate!

From version 1.5 HP USB tool and can combine Smart Start and Maintenance firmaware and even several smart start x86 and x64 in one pendrive. Besides that must be the latest versions of Smart Start and Firmware Maintenance for these combinations.


نصب و راه اندازی HP BladeSystem

In this paper we see a system of servers already quite common in any environment more or less nice, not go into the issue of whether it is better for some environments or other, or if it is more convenient, simple, spend less… see an environment based on HP blades, this is a HP BladeSystem, any particular model and see all the settings that can be done from your OA, HP Onboard Administrator, will be the management console all the chassis, the ‘irons’, from this console can manage any component / element, and view its status at all times.

So by way of introduction, this is what would be a blade system, that is a drawer where we put depending on the model 8 blades, 16… all in itself would be redundancy and compact, since it does not occupy the same 16 servers in a rack format 16 blades. We have so many power supplies as we need to feed the chassis, not individually, if not comprehensively, and fans to cool the environment. Could set by the sensors depending on the temperature more or less operating at speed, and power sources and depends on our environment we ride up the blades could be turned off if not needed (for example a VMware), with all that we can save a lot $$$ into electricity,air conditioners, physical space / racks,… I can see every blade (server) is in a bay, each server operating system would, totally independent of other blades (or not), we have a small display to view the status of all the chassis and to set some parameters. In the back we have the switches, since such servers prevent wiring, and wired ethernet are internal connections, and fiber, all switches are duplicated to prevent falls and have high redundancy. Besides having one or two chassis management devices, that is where we administer the system, from the so-called HP Onboard Administrator. Each HP BladeSystem es different, as well as between different manufacturers (an IBM BladeCenter example), but still the same ‘philosophy’ and are ‘almost’ set equal.

The question is first of all install the chassis (Irons) and then we start setting, for how to mount the bars there everyone who read the official doc if you do not know 😉 since in this document we perform configuration. After connecting the HP Onboard Administrator to switch him or us, we can connect to the default IP with the default username and password (admin / password). By this we understand that the first thing to change would be the IP for which we are interested and admin password. Another way would be from the Insight Display or display that has the chassis front panel, from there we can make basic changes such.

In “Rack overview” A brief summary of our chassis, of the items we have in him, a front and a rear. Come the name of our enclosure, and serial number and part number.

In “Enclosure information” shows the condition of the components, if we aluna warning or everything is OK.
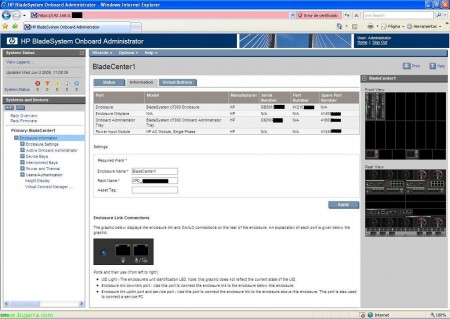
In “Enclosure information, flange “Information” we can change the name of our chassis / BladeSytem / enclosure, or name that owns CPD. Besides the serial ebseñarnos, also indicates a support for chassis connections, UID LED on the identification, the connection port between the chassis rest of our CPD (we make the connection with the BladeSystem continue below) llamado Enclosure link downlink port, Enclosure and also have the uplink port that will link to connect to the upper chassis or to connect a computer if necessary.

In “Enclosure information”, flange “Virtual Buttons” can turn on or off LED Light UID, to indicate any administrator what unit must do their homework.

In “Enclosure information” > “Enclosure Settings”. is a summary of BladeSystem devices and see if we need one to connect / enable and firmware all, we must always consider that we can have the latest firmware and all common elements have the same firmware!

In “Enclosure information” > “Enclosure Settings” > “AlertMail” for that, as the name suggests, to activate email alerts of our chassis.

In “Enclosure information” > “Enclosure Settings” > “Device Power Sequence”, flange “Device Bays”, can enable the lighting of the blades in the chassis with a priority order.

In “Enclosure information” > “Enclosure Settings” > “Device Power Sequence”, flange “Interconnect Bays”, can enable the bays on the chassis connection (switches) with an order of priority.

In “Enclosure information” > “Enclosure Settings” > “Date and Time” to configure the time service of the chassis, be a manual or schedule an NTP time server or.

In “Enclosure information” > “Enclosure Settings” > “Enclosure TCP/IP Settings” is where you can configure the name, IP, netmask, gateway and DNS servers to the chassis, the Onboard Administrator.

In “Enclosure information” > “Enclosure Settings” > “Network Access” flange “Protocols”, are the connection protocols that will qualify to enter the chassis. We have web access with HTTP or HTTPS, seguro shell with SSH, Telnet y XML reply.
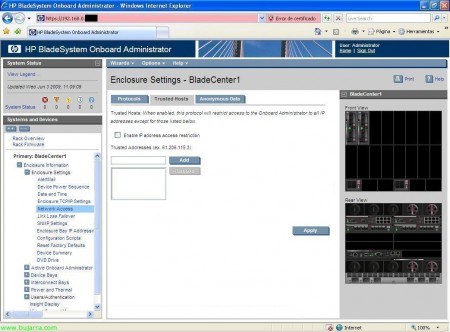
In “Enclosure information” > “Enclosure Settings” > “Network Access” flange “Trusted Hosts” if we enable only give access to the enclosure from these IP’s and not from the entire network.

In “Enclosure information” > “Enclosure Settings” > “Network Access” flange “Anonymous Data” simply if we enable chassis give you some information before it loguearnos, you can sign in to be information that interests us as Darla track 😉

In “Enclosure information” > “Enclosure Settings” > “Link Loss Failover”, if te Devices Onboard Administrator, and want to do that when the primary OA lose connection, al otro pass Onboard Administrator, we enable and indicate what time of seconds that pass without a network connection, primary OA (long as the network has secondary OA!),

In “Enclosure information” > “Enclosure Settings” > “SNMP Settings” in case we have configured our network monotorización system, to manage alerts, ads… Denial Nagios, was x put 😉

In “Enclosure information” > “Enclosure Settings” > “Enclosure Bay IP Adresses”, tab “Device Bays”, we configured the IP’s of the blades, not your operating system, if the iLO IP’s so we could later connect to each bay.

In “Enclosure information” > “Enclosure Settings” > “Enclosure Bay IP Adresses”, tab “Interconnect Bays”, we configured the IP’s of the rear chassis modules, of fiber switches, the ethernet…

In “Enclosure information” > “Enclosure Settings” > “Configuration scripts”, can import the configuration scripts to automate configuration chassis and do it faster, we import it from a file or from a URL.

In “Enclosure information” > “Enclosure Settings” > “Reset Factory Defaults”, because for that, to reset the chassis to the default settings from the factory,

In “Enclosure information” > “Enclosure Settings” > “Device Summary”, is one of the most commonly used screens to document a blade environment, is a summary of all the components that we have in our chassis, with the description, serial, part number, manufacturer, model, spare part number, firmware, hardware version… all, the blades, switches, power, coolers / fans, mezzanines of the blades, info of the chasis…

In “Enclosure information” > “Enclosure Settings” > “DVD Drive”, from here we can connect the CD / DVD of the chassis to a specific blade, case we need to get a CD / DVD on a particular blade. Man, is best done from the iLO connection… but tb is here 😛

In “Enclosure information” > “Active Onboard Administrator” tab “Status e Information”, we see the state of the chassis says, at temperatures of about, and others on our chassis.

In “Enclosure information” > “Active Onboard Administrator” tab “Virtual Buttons”, we have two buttons, one for the chassis completely Resetar, I hope this does not have to do ever, since there is no reason to reboot the entire chassis, or to turn on the LED UID information.

In “Enclosure information” > “Active Onboard Administrator” > “TCP/IP Settings”, is informational, on aand Onboard Administrator, network name information, and other IP data,
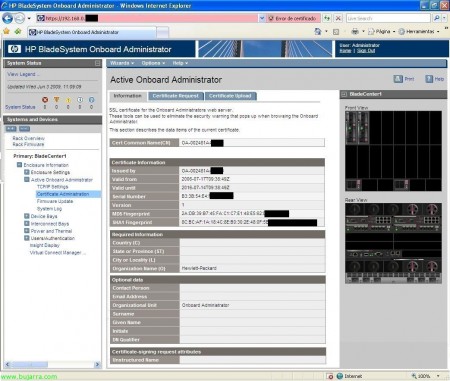
In “Enclosure information” > “Active Onboard Administrator” > “Certificate administration”, tab “Information” we have that, information on the certificate for the SSL web server.

In “Enclosure information” > “Active Onboard Administrator” > “Certificate administration”, tab “Certificate Request”, serve to generate a certificate our, using a self-signed certificate or CSR by power give it to a certificate authority for us to generate one ‘good’. And in the flange “Certificate Upload” I would climb.

In “Enclosure information” > “Active Onboard Administrator” > “Firmware Update”, could update the firmware of our chassis, if we want the, downgrade could make it, can upload it from a file of our team, from a URL or directly from a USB flash drive connected to the chassis.

In “Enclosure information” > “Active Onboard Administrator” > “System Log”, tab “System Log” We have everything that happens in our chassis, a LOG.

In “Enclosure information” > “Active Onboard Administrator” > “System Log”, tab “Log Options” LOG can redirect a server’s LOG’s, to a Kiwi Syslog type.

In “Enclosure information” > “Device Bays” we have all our blades, with their status, if the UID is on or not, bay number, state on / off, iLO IP address, and state of the DVD drive if it is connected or not.

In “Enclosure information” > “Device Bays” > BLADE > flange “Status”, have the information on our blade, if you would have some warning here would tell us what the problem, or if you have a high temperature. Certainly, if we select hardware element, we indicated in the drawing on the right on which device we, helps when we have enough elements or in the theme of the switches.

In “Enclosure information” > “Device Bays” > BLADE > flange “Information”, blade shows information in question, all of it is quite interesting, o a anotar, as the MAC or WWPN…

In “Enclosure information” > “Device Bays” > BLADE > flange “Virtual Devices”, we have different options on our blade power button, and turn it the UID.

In “Enclosure information” > “Device Bays” > BLADE > flange “Boot Options”, select the boot order of the blade, or next boot,

In “Enclosure information” > “Device Bays” > BLADE > flange “Log IML”, o Integrated Management Log, have the log’s of the blade, everything that happens will be recorded.

In “Enclosure information” > “Device Bays” > BLADE > “iLO” flange “Processor Information”, can do remote management of equipment, ideally to remotely control the computer, so we click on “Integrated Remote Console” for control of the team and to manage their devices or if we have it in Java JRE “Remote Console”.

We open in a new window control on remote computer, to do everything we need, mount remote units, connect CD / DVD the remote site, restart, shutdown…

In “Enclosure information” > “Device Bays” > BLADE > “iLO” tab “Event Log”, filtered records have a team at iLO.

In “Enclosure information” > “Device Bays” > BLADE > “Port Mapping”, tab “Graphical View” we can see the internal connections of the blade, This screen is used to understand the inner connection between the blade and the switches we have in our chassis, we can see the blade adapters (Embedded or integrated and Mezzanines) each with its internal ports, are usually additional network cards or HBA’s (fiber) with one or more ports. And each port on each adapter looks at what port or ethernet fiber switch is connected.

In “Enclosure information” > “Device Bays” > BLADE > “Port Mapping”, tab “Table View” have the same information as in the previous tab but different view 😉

In “Enclosure information” > “Interconnect Bays” shows the chassis switches, back, in my case, two swtiches Ethernet and two fiber, shows the state of them, and if you have the power UID, switch type and model, su IP address management.

In “Enclosure information” > “Interconnect Bays”tab “Status” can view the status and diagnostic switch in question, if you have any electrical issues alert, Temperature…
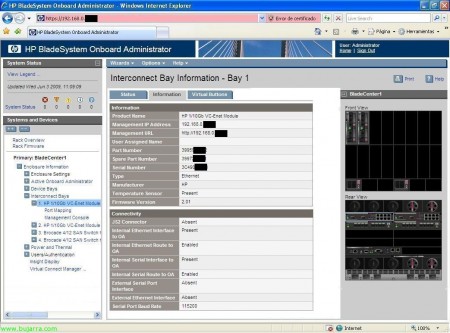
In “Enclosure information” > “Interconnect Bays” > Bay ethernet > tab “Information” see it, information about this device, certain to score in the correct documentation or to arrange a future of trouble,

In “Enclosure information” > “Interconnect Bays” > Bahia ethernet , flange “Virtual Buttons” same as above, is a virtual button to turn off / reboot the device or to turn on the UID if necessary,

In “Enclosure information” > “Interconnect Bays” > Bahia ethernet > “Port Mapping” we can see the blades we have connected to this ethernet switch indicating which mezzanine what blade is what switch port, MAC also shows the device in question, and if a switch would display the WWNN fiber.

In “Enclosure information” > “Interconnect Bays” > Bahia ethernet > “Management Console”, We initiate the switch management console, and would switch level configuration, to set it up the zoninga that interest, through “HP Virtual Connect Manager”,

In “Enclosure information” > “Interconnect Bays” > BAY fiber > tab “Status”, can view the status and diagnostic fiber switch in question, if you have any electrical issues alert, Temperature…

In “Enclosure information” > “Interconnect Bays” > BAY fiber > tab “Information” see it, information about this device, certain to score in the correct documentation or to arrange a future of trouble,

In “Enclosure information” > “Interconnect Bays” > BAY fiber, flange “Virtual Buttons” is the virtual button to turn off / reboot the device or to turn on the UID if necessary,

In “Enclosure information” > “Interconnect Bays” > BAY fiber > “Port Mapping” we can see the blades we have connected to this ethernet switch indicating which mezzanine what blade is what switch port, also shows the connected HBA WWNN, perfect to have everything well documented and annotated for configuration issues paths.

In “Enclosure information” > “Interconnect Bays” > Bahia ethernet > “Management Console”, We initiate the switch management console fiber, and would switch level configuration, to set it up the zoninga that interest, we have a tutorial here on how to configure a switch fiber http://www.bujarra.com/?p=2752,

In “Enclosure information” > “Power and Thermal” see the status of the chassis electrical issue, and su temperature and in case of any mistakes we mark with error.

In “Enclosure information” > “Power and Thermal” > “Power Management” We can manage the configuration of the redundancy on the chassis power, so as to enable “Dynamic Power” for putting cost savings F.A. you do not need a standby state not to use them unless necessary. Note, it sounds a tall tale with this issue of saving or putting virtualization topics such chassis, saving is true, just take a calculator and multiply the servers so you spend so worth the hour kilowatt (kWh) and you can amaze with the costs in one year! all this you must add the cost of air conditioning of course… if we reverse, there is nothing better than a blade virtualization environment.

In “Enclosure information” > “Power and Thermal” > “Enclosure Power Allocation” spending shows us that we need the items currently in the chassis, our blades, switches, modules… and what would be our total capacity. One should always keep in mind that if we damaged a power supply, if we covered!

In “Enclosure information” > “Power and Thermal” > “Power Meter”, tab “Graphical View” shows a graph of our chassis consumption,

In “Enclosure information” > “Power and Thermal” > “Power Meter”, tab “Tablel View” records shows a consumption of our chassis,

In “Enclosure information” > “Power and Thermal” > “Power Subsystem” shows the status of all our power supplies, and the power mode, and if we would have redundancy.

In “Enclosure information” > “Power and Thermal” > “Power Subsystem” > “Power Supply X” will show specific information and a power source in question as its capacity / consumption, serial, part number, spare part number…

In “Enclosure information” > “Power and Thermal” > “Thermal Subsystem” tab “Fan Summary” shows a generic view of the fans or coolers that have our chassis and their use.

In “Enclosure information” > “Power and Thermal” > “Thermal Subsystem” tab “Fan Zones”, shows areas of our chassis ventilation and whether they are covered or not by fans to cool the area, normal is placed behind the blades fans, because it does not make much sense to place them on the other side, sometimes anyway not us who assemble the chassis if not an HP engineer, so not all our decisions 😉

In “Enclosure information” > “Power and Thermal” > “Thermal Subsystem” > “Fan X” and shows the individual status of each fan or cooler, and their use,
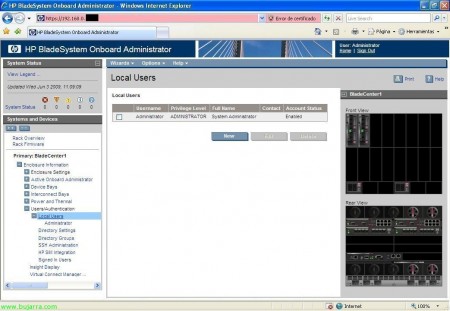
In “Enclosure information” > “Users / Authentication” > “Local Users” we have a local user management on the chassis, manage access to blade environment.

In “Enclosure information” > “Users / Authentication” > “Local Users” > “Directory Settings”, to configure access instead of local users with service users through LDAP Directory,

In “Enclosure information” > “Users / Authentication” > “Local Users” > “Directory Groups” to manage groups of users from LDAP,

In “Enclosure information” > “Users / Authentication” > “Local Users” > “SSH Administration”, manages the keys for SSH,

In “Enclosure information” > “Users / Authentication” > “Local Users” > “HP SIM Integration” > sirve para integrar el Onboard Administrator con HP Systems Insight Manager, to pass credentials.

In “Enclosure information” > “Users / Authentication” > “Local Users” > “Signed in Users” shows the currently logged users on the chassis of blades or historic logins,

In “Enclosure information” > “Insight Display”, shows the small screen that has the front of the chassis, a small display that will enable us to perform certain basic configurations with a couple of buttons, and view the status of the chassis briefly.

Well, the interesting thing is that if we set some of this is well documented, as well as for us to deliver to the customer and who come after us know what and how it is mounted, with logical drawings like this on the connections and documentation of IP’s, MAC’s, WWNN, WWPN, cabling… and perfectly in this structure would blade, more comfortable to manage and maintain! a bargain!!!


نصب و راه اندازی HP LeftHand

This paper vera certain generic configurations that allow these cabins HP SAN HP Lefthand calls, This case is made by a virtual booths under a VMware, and for working smoothly in an environment much more flexible laboratiorio. HP has several models cabinas Lefthand físicas, all with the same system, but with different capacities, Disk models, bocas ethernet… serían la serie HP LeftHand P4500 y HP LeftHand P4300. But also for production environments has the virtual cabin HP LeftHand P4000 Virtual SAN Appliance o VSA.

In this document we will see the main features of the cabins, such as the Storage clustering (gives higher performance and capacity), Network RAID (greater availability of data), Thin provisioning (reduces costs and improves the utilization of disk capacity), iSCSI (Ethernet technology) Snapshots and replication using Remote Copy (for local or remote replication, to improve the protection and availability of data).

This is the scenario that will be mounted in the wake of this document, be mounted four cabins SAN HP Lefthand, will create a multisite cluster type, create a LUN, RAID network configure replication to see that senses going and what it means, LUN’es to present the host. You will see how to create a snapshot of the LUN to use as a backup or dump it on another LUN, to use the SmartClone… what we need are as iSCSI across a private network environment where they will be booths and legs ethernet hosts that want to connect to them, clients / positions must not be connected to this network. The network should be at least 1GB to be supported and ideally have a 10Gb iSCSI network!

Good, we started the first cabin, have little configuration, with agregarles management IP address we would be better. So we started and when we asked for a login ‘start’.

We press the Enter here the “Login”,

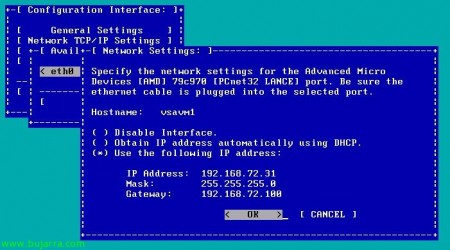
And we will “Network TCP/IP Settings” > “eth0”, select “Use the following IP address” and specify the IP address for this cabin. “OK”,

“OK” to save changes,

“OK”, and with this we completed the minimum set in the cabins HP Lefthand.

Now what we have to do is connect to manage booths, we will use the Management Console calling cabs “HP LeftHand Centralized Management Console” the “HP LeftHand CMC”.

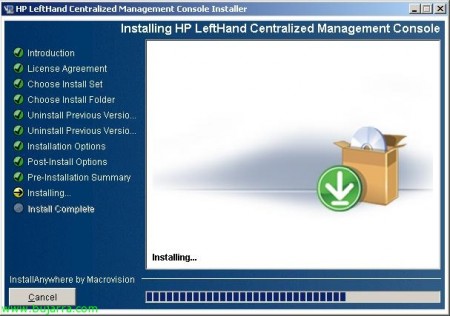
Instalando HP LeftHand Centralized Management Console,

The need to install Windows on a computer that is connected to the iSCSI network, and that management is on the private network iSCSI.

Installation is a simple wizard, we follow and have the console installed to manage our cabins independently or general level by the Management Group. “Next” to start the wizard,

Accept the license agreement “I accept the terms of the license Agreement”, “Next”,

Select custom installation marking “Custom” & “Next”,

Selected “Application” to install the console, optionally “SNMP Support” SNMP to audit with booths and “Documentation” for that, documentation & help. “Next”

Select the installation path, by default: “C:Archivos de programaLefthand NetworksUI”, “Next”,

If we icon…

If we want to open the console to finish & Miscellaneous,

A summary of the installation and click “Install” to finally start the installation of the management console,

… wait a few seconds while installing…

Ready!

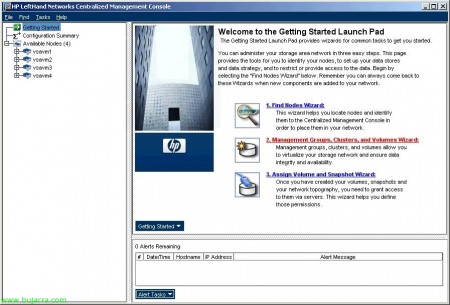
Open the console “HP LeftHand Centralized Management Console”

If this is the first time we open this console, we need to configure, namely, add storage arrays, create a group the various management groups, create a cluster, or create a LUN. All this we can do by attending. So first we have to add the cabins from “1. Find Nodes Wizard”

“Next” to start the wizard,

We can search the cabins for fixed IP address, name or directly we make a broadcast on the network to look for, I choose the first option, more comfortable.

From “Add…” add the IP range where are my cabins, and frame option “Auto Discover” So the next time you open the console I automatically save these cabins on the console, press “Finish”,

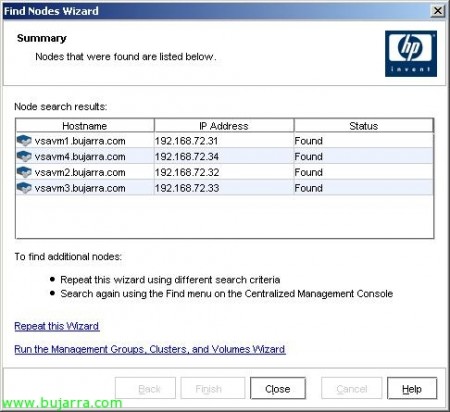
Well, We detected four cabins, with their names, IP’s… click on “Close” to close the wizard.

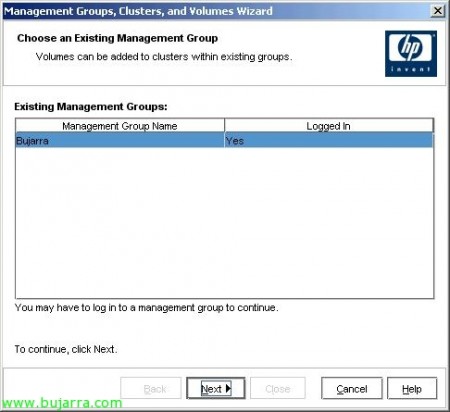
Then hit “2. Management Groups, Clusters and Volumes Wizard” to create, first administrative group to manage booths, second, create a cluster between interests us and the type that we are interested. And finally (optional) create the LUN’s.

“Next” to start the wizard,

We create a management group to our environment from “New Management Group” & “Next”,

We indicate the group a name and select booths belonging to want this administrative group, In principle it is interesting to add all cabs to work with them,

We create a username and a password to protect this administrative group, to only authorize us or who can manage, “Next”,

Configure group time, the interesting thing will be to use an NTP server on the network that have (un firewall, a domain controller…), in my case I set it up manually from the second option, “Next”,

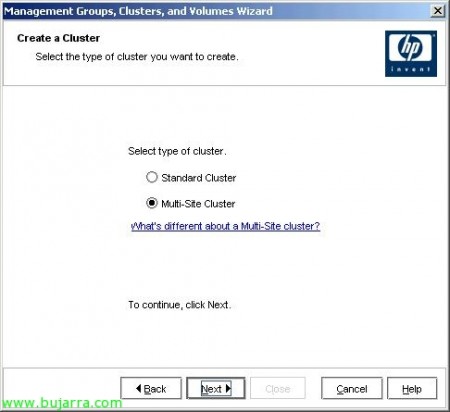
Well, Here we set the type of cluster that we; if only we will have a site, location, select one “Standard Cluster”, in return, if we have at least two sites, physically separated, select one “Multi-Site Cluster”. In this paper we will multisite cluster,

We give a name to the cluster and select cabins (o storage node) we want to participate in balancing the information with our organization, selected in principle all,

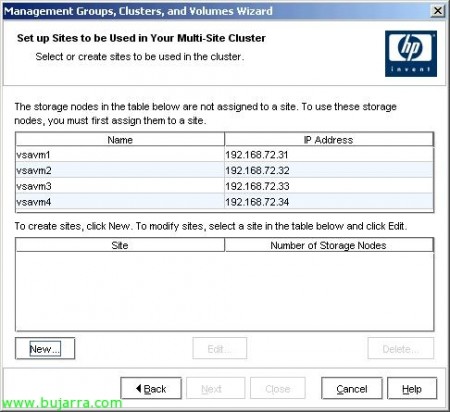
But now we must set (if we) sites, or physical locations, for proper administration, so click on “New…” to create sites,

In my case I will create two sites and cabins will associate a site adding them to your location. Eye, must have the same cabin somewhere in the other sites, and of course the same model.

Well, shows no cabins available and teaches us that we have configured sites, “Next”,

We add from “Add…” an IP address (Virtual IP) for the cluster, that is where we connect to our iSCSI iniciaciadores,

Indicate an IP address and a netmask, “OK”,

The wizard also asks us if we want to create a volume and, a LUN, this is optional, but I prefer to do it later as it is not that I have neither space! So frame “Skip Volume Creation” & “Finish”,

… waited a while while creating the management group, unites all canbinas, creates the cluster…

Once, click on “Close” to manage this new environment.

Here we have the Management Group, with the cluster, nodes, and all settings that could manipulate,

If we want a computer to connect to our volumes or our LUN’es, first we have to discharge the initiator of that team, for this, we will “Servers” and Right “New Server…”

This Get, allow this computer to access the LUNs I tell you later, is a type to aliases, indicate their name, description, if it reads give access via iSCSI on, if we want to use the load balancing (that do not support all initiators), if we want to use CHAP on the, and the name of the originator or Initiator Node Name. The iSCSI initiator name you can get from the host properties that will be attached to cars. “OK”,

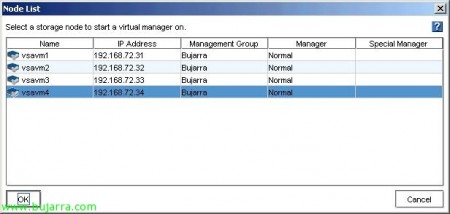
Las cabinas HP Lefthand, Managers need to have all the data correctly replicated cabins, to communicate with the storage cabinets,or fall to withstand different nodes… Being number quorum = n; N = Number of managers + 1. Manager is a process which controls the environment, associated with a management group. It is recommended that the number of Managers is odd, namely,in the configuration I have now, I have four cabins with manager initiated in each, Debere start a manager more, and I have the option (less desirable) de usar a Virtual Manager (that run under one of the cabins) and only be lifted manually and after dropping one of the nodes, so do not miss the quorum. Or else, have the option of using a Manger Failover, that this should be a part of the booths (advisable) at a third site (or at least network separate booths), yes would rise automatically when a fall from a node. This runs on a virtual machine in VMWare ESX or is a VMware Server.

So achieve that if a node drops, or two; have 3 manager’s raised and you can continue working on the current status of our organization and quorum remains.

And would select which node we want the Virtual Manager.

Good, we will create a volume, a LUN, order subsequently to iSCSI initiators and can work with our cabins share alamcenamiento. From “Volumes and Snapshots” with right “New Volume…”

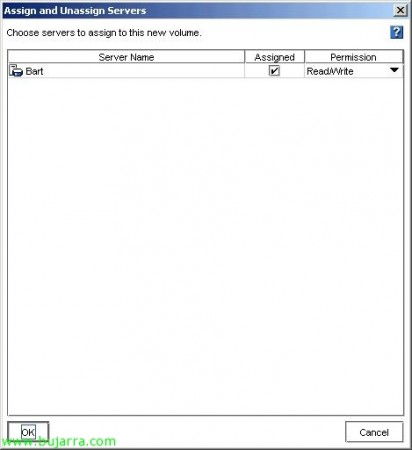
Tab “Basic”, indicate the name of the volume, a description, a size that we want to give and that is what we want to present servers from “Assign and Unassign Servers…”. We recommend creating a volume with the size needed, because then you can resize and make it smaller or larger is very simple.

Select the server you want to see this record, mark “Assigned” and select the permissions you want to have, indicated for full access “Read/Write”, “OK”,

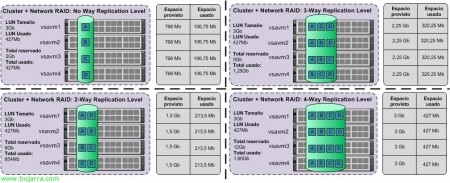
Tab “Advanced” important to indicate the type of replication that we want this LUN between nodes or cabins that is a characteristic of this type of cabins (see the image below for more detail). In addition to setting the priority of replication between the cabins “Availability” or availability “Redundancy” or redundancy. And the type of LUN, is primary or remote

The type of replication indicates how many times the data is to be copied, namely, 2-Way indicates that the information is duplicated, 3-The info will be tripled Way and 4-Way will cuatriplicada. Now, depends on the nodes that have to follow the patterns of writing, for it is better to seek our case. As we shall see, to have higher levels of replication, more room will be reserved, more we occupy our information but we will be much more protected.

This is the aspect of the newly created LUN.

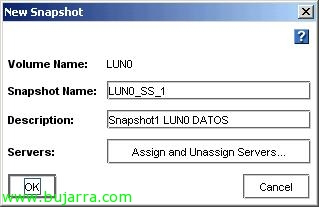
On a volume, we can create snapshots or snapshots, to stay in a fixed point and could go back at any given time, losing the information that has been written subsequently. Or directly to rely on them to back serguridad (remote), we also present these snapshots to teams if our interest. To manually create a snapshot volume right “New Snapshot…”

We indicate the name of the snapshot, default uses the terminology of two SS to indicate that it is a snapshot. “OK”.

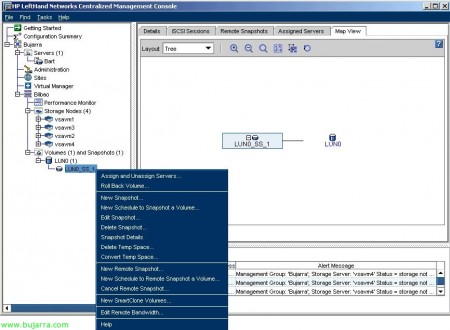
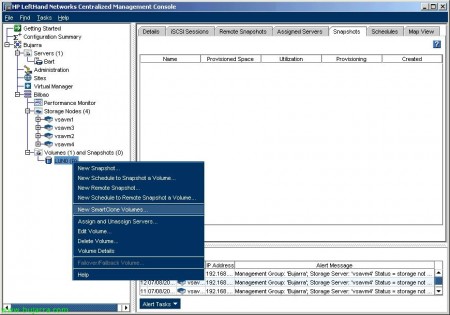
And these would be the options we have on a snapshot, Roll back the interesting 😉

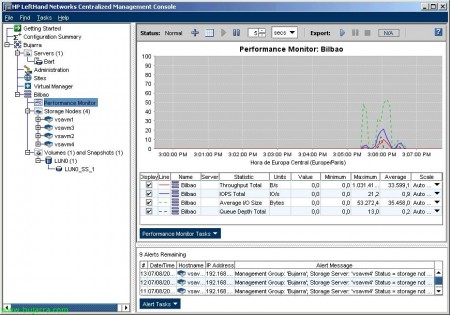
We can see the performance of the cabins, or any member of our organization since “Performance Monitor” can add or remove counters to our graph.

Or for example, from “Use Summary” we can see a graph where the actual uses of our data, data reserved (or provisioned), but these snapshots, what is not used, the total size, Thin Provisioning or would use instead of the LUN Full’d see that I have different information.

The above, snapshots can do remotely, namely, they can be put in a volume, for this, volume on right “New Remote Snapshot…”

We have to keep the points we asked, first, click on “New Snapshot…” to create the snapshot,

Same as above, first create a snapshot, we name, “OK”,

And now we must specify a remote volume displaying the combo, if we do not have, will have to create one from “New Remote Volume…”

“Next” to select the management group,

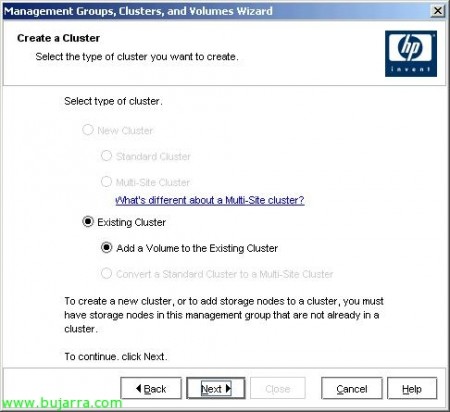
Existing cluster (“Existing Cluster” & “Add a Volume to the Existing Cluster”), “Next”,

In this cluster, that automatically discovers, “Next”,

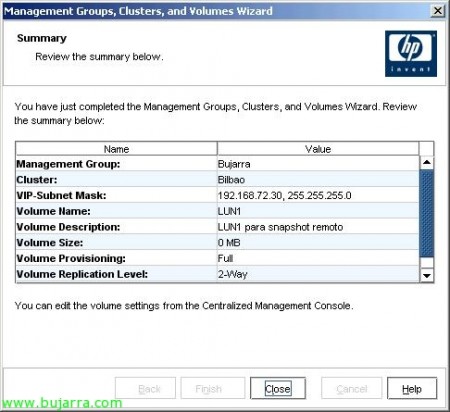
We put a name to this volume, and if we want to have replication or not your content, “Finish”,

We confirm and “Close”,

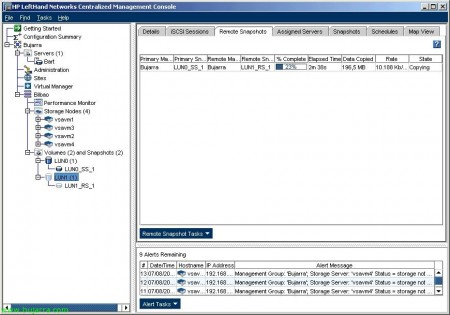
Now, we give “OK” and we will create a snapshot of the source volume and we will mount / copy as if it were another volume.

After a while of copies and replicas of information, see that we would have two volumes with the same information,

We can use another feature of the HP Lefthand cabins to create volumes SmartClone, this is to save space in our cabins. A practical example, if we have teams (servers x example) with the same base system, create a LUN for it, install the operating system on it and configurations necessary, this will occupy (2Eg Gb), if we have 10 2Gb for servers using the same information we are wasting 20Gb. The idea is to create a volume with this setup and create SmartClone, each server to use only the information you need using the base disk; each server and store your information in your individual LUN, without having to duplicate information senseless.

Good, for this, on a volume and with the information we want to use the other teams, Right “New SmartClone Volumes…”

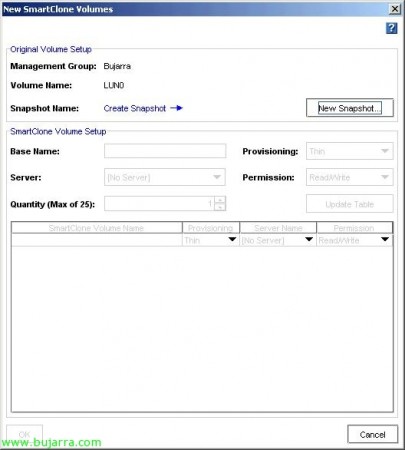
First we make a snapshot “New Snapshot…”

Ditto, “OK”,

We indicate how we want to call this volume basis, the type that will supply the volumes that we create, for these environments is recommended to use “Thin”, and not “Full” to occupy what is used (so we can create more volumes with size not have available, very dangerous but can, may). Selected servers (iSCSI initiators) we want to see each SmartClone and permissions (the example graph is not adequate, since I did not have more teams to make the sample). We “OK”,

And if we go back to the graph before, see (in my case) or we are going to use more space than we dispobible! (eso es Thin Provisioning). Full Provisioning reserve all the space we assign a LUN, although not used.

Well, we can get through all the tabs you need console can also get information from our hardware, the status of their connections…

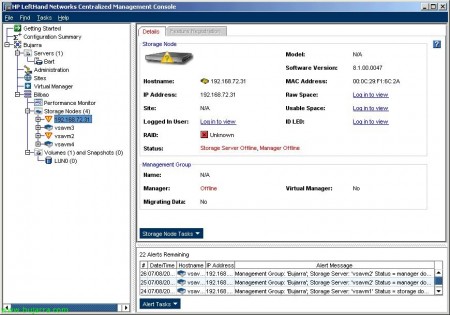
And if we drop a cab and have raised the Virtual Manager (o el Fault Manager) we will see how we can support simultaneous fall to two nodes at once.

To connect to this storage, if possible we will use the iSCSI initiator that provides HP Lefthand, since it allows a better balancing of the connections, although only for Windows, HP MPIO Lefthand DSM Dynamic Load Balancing, do dynamic balancing of obtaining data from different connections cabins. However with a traditional iSCSI initiator such as Microsoft iSCSI Initiator, redirected by asking the host cluster and bringing more liberated (Virtual IP Static Load Balancing).


  • 0

سرور HP Proliant DL580 G9

HP-Proliant-DL580-G9-بررسی-سرور

سرور اچ پی HP PROLIANT DL580 G9 یکی از قویترین سرور های خانواده پرولیانت تولید شده توسط شرکت اچ پی می باشد. این دستگاه مشابه دستگاه نسل قبلی خود DL580 G8 می باشد با این تفاوت که از پردازنده های اینتل سری E7 ورژن سوم را پشتیبانی می کند. یکی از مشخصات بارزی که این دستگاه را از دیگر برند های مشابه متمایز میکند دارا بودن از ۹ اسلات I/O با درگاههای PCI-e 16x می باشد که این امکان را میدهد تا از چندین کارت بصورت OPTIONAL مانند TESLA, GRID, Quadro, Geforce, Radeonو XEON PHI استفاده کرد البته استفاده از این کارت ها به پورت های برق جداگانه ای نیاز دارد  که نیاز به سفارش جداگانه دارد . این دستگاه با داشتن چهار سوکت CPU میتواند با استفاده از سری پردازنده هایE7-8800 V3 و E7-4800 V3 تا ۱۴۴ هسته بصورت HyperThreading و ۷۲ هسته فیزیکی با فرکانس ۲٫۵ گیگاهرتز و ۴۵MB کش به ازای هر پردازنده پشتبیانی کند و همچنین با داشتن ۸ مموری کارتریج که هرکدام از مموری کارتریج ها دارای ۱۲ اسلات رم هستند که این امکان را میدهد که بتوان تا ۶ ترابایت رم بصورت ۹۶ عدد رم ۶۴ گیگابایتی با فرکانس ۲۱۳۳ مگاهرتز را بر روی دستگاه راه اندازی کرد . این دستگاه از جدیدترین RAID CONTROLLER ها استفاده می کند که میتوان از هاردها و SSD با سرعت انتقال ۱۲گیگابیت بر ثانیه با استفاده از RAID های ۰,۱,۱۰,۵,۶ بصورت ۵ درگاه هارد و ۱۰ درگاه هارد استفاده کرد . داشتن چهار پاور قدرتمند ۱۵۰۰ وات تمامی نیاز های یک دستگاه از برق را تامین میکند چه از لحاظ سوختن و قطع برق بصورت کابلی (REDUNDANCY ) و چه از لخاظ تامین برق قطعات کامپیوتر داخل این دستگاه .

سرور-DL580-G9

ویژگیها و قابلیت های اصلی سرور
Commanding performance and breakthrough scalability for your most demanding
applications
• Speed up your mission-critical enterprise, business intelligence, and database applications with
up to 39 percent faster processor performance and 20 percent more cores than the previous
generation1
with up to four sockets and 72 cores with Intel®
Xeon®
E7-4800/8800 v3 processors.
• Get up to 16 percent performance gain2
for in-memory computing and large-scale virtualization
with support for up to 6 TB of memory capacity with 96 HP DDR4 SmartMemory slots with
speeds of up to 1,866 MHz.
• Adapt and grow to meet changing business needs with nine FL/FH PCIe 3.0 slots (standard) for
GPGPUs and choice of HP FlexibleLOM or PCIe standup, and 1GbE, 10GbE, or InfiniBand Adapters.
• Support for HP NVMe Mixed Use and Write Intensive PCIe Workload Accelerators, ideal for
Database and virtual desktop infrastructure (VDI) workloads or online transaction processing
(OLTP) and Business Intelligence workloads.
• Access data faster with the redesigned HP Flexible Smart Array and HP Smart SAS host bus
adapter (HBA) Controllers, with the flexibility to choose the optimal 12 Gbps controller for
your environment.
Leading x86 availability and rock-solid reliability your business can depend on
• Enjoy increased system availability and lower service requirements with comprehensive
fault management and diagnostics.
•Improve reliability and data protection with HP Smart Array Controllers featuring
HP Secure Encryption, Advanced Data Mirroring, and backup power protection with
the HP Smart Storage Battery.
•Increase security with four new levels of Secure Boot with support for Unified Extensible
Firmware Interface (UEFI) mode.3
•Integrate performance, uptime, and productivity into a personalized, simplified support
experience with HP Proactive Care Support Services.
Compelling agility and efficiencies for scale-up environments
• Reduce your cooling expenses with supported ASHRAE A3 and A4 configurations.4
• Lower power costs with high-efficiency redundant HP Common Slot Power Supplies providing
up to 94 percent efficiency (Platinum Plus), and infrastructure power efficiencies with -48 VDC
input voltages and support for HP Power Discovery Services.
• Enhance efficiency with customer-inspired features such as front-access processor/memory
drawer for ease of serviceability, hot pluggable fans and drives, optional SID for health and
monitoring of components, and Quick Reference Code for quick access to product information.
Agile infrastructure management for accelerating IT service delivery
• Enjoy faster, lower-cost infrastructure management and a single integrated view of your
IT infrastructure with HP OneView.
•Monitor infrastructure health and manage support more easily with HP Insight Online.
• Configure in UEFI boot mode, provision local and remote with HP Intelligent Provisioning
and Scripting Toolkits.
• Deploy, monitor, and support your server remotely, out of band with HP Integrated Lights-Out
(iLO) embedded management.
• Optimize firmware and driver updates and reduce downtime with HP Smart Update.

HPقیمت گیری و خرید آنلاین سرور


  • 0

استوریج های HP

HP Storages

راهکارهای ذخیره سازی اطلاعات ارائه شده توسط شرکت HP راهکارهایی سریع ، قدرتمند ، انعطاف پذیر و بهینه با قابلیت Application-Integrated هستند که می توانند از سطح Small تا بالا انتخاب شوند.

HP-Storage-استوریجهای-شرکت-اچ-پی

  •  All-Flash and Hybrid Arrays
  • Midrange and Enterprise
  • Entry Level Storage
  • Availability , Protection and Retention
  • Software Defined Storage
  • Management and Orchestration
  • Storage Networking

All-flash and Hybrid Storage

گروه-فنی-و-مهندسی-وی-سنتر-تماس-با-ما

Accelerate performance, consolidate space and meet SLAs more affordably with high-performance, resilient SSD-optimized all-flash and hybrid storage arrays.

Accelerate your business with all-flash, hybrid and converged flash storage systems. Our flagship HPE 3PAR StoreServ family is ideal for enterprise-level storage. The hybrid HPE StoreVirtual and HPE MSA storage solutions make flash storage accessible to smaller data centers.

HPE 3PAR StoreServ Storage Array

Born for the All-flash Data Center

The speed—3 million IOPs and from 0.2ms latency—to keep up with any demand and the reliability to meet mission-critical service levels. All at a price point equal to traditional disk-based storage. It’s All-Flash No Limits.

Fast

Respond in real time with hardware-accelerated data services, massively parallelized architecture and software performance optimization.

Affordable

Industry-leading economics and density enable flash storage for every application. Prices start at just $19,000, with the usable GB cost as low as $1.50 with deduplication.

Protected

Enterprise-class features include a unique multi-controller scale-out design—forged in the world’s harshest data centers—for 99.9999% uptime and built-in protection.


Midrange and Enterprise Storage

Tier-1 availability and performance to meet the most demanding SLAs with affordability to fit any budget

Eliminate Storage Boundaries with Storage That Spans Low to High

HPE Converged Storage platforms are architected with ‘polymorphic’ design to cover virtually any workload and budget. That includes consistent features and management grounded in a common storage architecture. It saves you time and money while future-proofing your IT.

Flash-optimized Tier-1 Storage for Any Service Level

Provision instantly, respond effortlessly, migrate seamlessly, scale efficiently and assure high performance in a world of unpredictable demand. HPE 3PAR StoreServ scale to support the world’s most demanding cloud service providers as well as enterprise and midrange applications. Multi-tenant design and hardware-accelerated thin technologies enable 6-nines availability and extreme performance at low TCO.

Virtualization, Cloud and ITaaS

From client and server virtualization to hypervisors and hybrid clouds get the details, reference architectures, and guidance you need.

Mission Critical Applications

It’s about the application—get the Microsoft, Oracle, and SAP solution details and technical resources to store and protect your business data.


Entry-level Storage Systems

Entry-level-Storage-Products-استوریج-HP


Simple, affordable storage for small and medium sized businesses that need to compete big.

Start Now and Grow with Low TCO

Get the SMB storage solution that your business needs today, with a choice of storage media—including flash and disk—plus intuitive management and powerful data tools. Scale out at your own pace with expandable disk enclosures, convenient tools to eliminate time-consuming and risky data migration, and a simple controller swap that lets you upgrade without compromise.

Stay Up and Running—and Profitable

Minimize downtime and maximize availability for your small or medium size business with reliable data disaster and recovery tools. Replication and snapshot capabilities are part of the HPE MSA family.

Make Access, Productivity and Collaboration Easy

Now you don’t need an IT specialist to share unstructured file data with those who need it. Deliver scale and security using network-attached SMB storage solutions like HPE StoreEasy. Ensure enhanced data availability across multiple and remote locations with flexible Storage Area Network arrays like the best-in-class HPE MSA storage family for physical and virtual applications.


Data Availability, Protection and Retention

Reduce risk and cost with end-to-end integration—from applications and arrays to deduplicated data protection and archive systems.

Simplify Business Continuity and Data Management

Today’s businesses demand aggressive SLAs. Data-loss risks and downtime recovery must be minimized. We can equip your data to respond with reduced storage requirements and enhanced Recovery Point Objective (RPO) and Recovery Time Objective (RTO).


Application Availability

Assure Applications are Always On

Recovery Time Objectives (RPO) and Recovery Point Objectives (RTO) help maintain continuous application usability—and assure productive users and happy customers.

Our broad range of storage software options support RPO and RTO, and integrate with application-specific recovery technologies such as VMware Site Recovery Manager.


Data Protection

The Focus Is on Recovery

It can take three or more traditional—separate and disconnected—backup processes to protect every application. But, HPE StoreOnce Recovery Manager Central featuring Express Protect provides simple, flexible and low-cost recovery at industry-leading speeds.

Only HPE combines the near-instant recovery point of snapshots with reliable and cost-effective disk backup.

Long Term Retention

Improve Efficiency for Active Archives

Data growth and regulatory requirements make data retention and archive critically important.

The new LTO-7 based HPE StoreEver tape solutions make accessing, managing and sharing files on tape as easy as disk. View tape contents with drag and drop simplicity. Minimize software dependencies to assure long-term viability.


Software Defined Storage

Eliminate complexity with SDS-based solutions that include software, storage systems and hyper-converged appliances.

Build a More Flexible Data Architecture

Simplify and lower the cost of server virtualization with a scale-out and software-defined data fabric with the flexibility to deploy as a virtual machine, a hyper-converged appliance, a dedicated storage array, or a hybrid-cloud building block.

Flexible Storage Gets You Back to Business

Hewlett Packard Enterprise software defined storage (SDS) enables you to create a pool of shared storage from industry-standard server capacity without the need for dedicated storage area network (SAN) infrastructure. Hyper-convergence is the trend of co-locating applications, SDS and virtualization software on the same physical device. Learn why SDS is critical for hyper-convergence and discover thetop 10 considerations when buying a hyper-converged infrastructure.

Our SDS, based on HPE StoreVirtual technology, runs within VMware vCenter, Microsoft Hyper-V or Linux KVM environments on the same server running your virtualized applications. SDS uses scale-out iSCSI SAN technology to provide capacity to any physical or virtual server on the network and includes advanced data services such as auto-tiering, storage federation and storage clustering. Enhance and simplify virtualized client or server projects as well, for ITaaS solutions.

Our unique portfolio of software and hardware products provide the flexibility and agility to start small and grow in any direction your business takes you. The HPE StoreVirtual software defined storage family is available as a software-only virtual storage appliance (VSA), a physical storage array, embedded in HPE Helion OpenStack® or as a turnkey hyper-converged appliance.


Management and Orchestration

Management-and-Orchestration-Portfolio-سیستمهای-مدیریتی


Evolve beyond storage management to open, data center-wide control points that speed provisioning and reduce operational silos.

Management Outside the Box

With Hewlett Packard Enterprise, you can get past hardware management limitations with open, automated orchestration. Control storage, Compute and networking resources as well as data services across physical and virtual domains. All while working with many third-party tools. Implement any storage solution you need—software-defined, purpose-built or traditional.

Unified, Open and Cloud-enabled

Our software-defined management and orchestration solutions feature standards-based APIs and the HPE Helion OpenStack cloud platform. Create highly available scale-out storage and flexible disaster recovery with HPE StoreVirtual VSA, the fully integrated storage solution for HPE Helion OpenStack.

Unified management also transforms storage control in your VMware and Microsoft virtual environments. Install, configure, provision and monitor software-defined storage in minutes. Automate orchestration from within those environments. Then manage it all from a single console, minus the manual processes and proprietary roadblocks.


Storage Networking

Storage-Networking-تجهیزات-استوریج-HP


Get a superior SAN experience from a broad selection of trusted HPE StoreFabric products focused on performance and resiliency.

Unlock the Untapped Capability of Your Investment

Eliminate the limitations on your storage investment by modernizing your storage network. Hewlett Packard Enterprise provides dynamic end-to-end solutions, solving your storage networking challenges with nearly 15 million SAN fabric ports deployed worldwide. Agile HPE StoreFabric host adapters, multi-protocol switches and highly scalable directors for cloud-optimized SANs ensure reliability and high performance.

Modernize Your SAN Fabric, Leverage the Full Potential of Flash

HPE StoreFabric products help you leverage the full capacity of your storage with lower cost, high performance and the increased reliability you expect. Cut latency in half by upgrading to 16 Gb/s Fibre Channel and gain enhanced visibility and manageability with HPE Network Advisor Software. Meet the requirements of your SLAs with guaranteed interoperability, integration and support unified by a single vendor.


سرور HP Proliant DL380 G7

تا چند سال پیش وقتی در بسیاری از سازمان‌ها صحبت از پیاده‌سازی یک شبکه به میان می‌آمد، اولین تصوری که در ذهن مدیران شکل می‌گرفت، نیاز به کیس‌های بزرگ با قطعات متداول و آشنای یک سیستم دسکتاپ بود، البته به‌عنوان یک اقدام پیشگیرانه عملکرد و قدرت این سیستم باید بالاتر از دسکتاپ‌های عادی سازمان بوده و حافظه بالاتری نیز داشته باشد. همین دیدگاه باعث می‌شد که عملیات اطلاعاتی در اکثر این سازمان‌ها به یک فرآیند شکننده تبدیل شود که با کوچک‌ترین مشکلی به وضعیت غیرعملیاتی فرو می‌رفت.

با این‌حال خوشبختانه به نظر می‌رسد که دیدگاه مذکور به تدریج در حال محو شدن است و امروزه بسیاری از مدیران در سازمان‌های حساس به این نتیجه رسیده‌اند که برای تداوم بی‌نقص عملیات خود به یک زیربنای قابل اعتماد نیاز دارند. واقعیت این است که طراحی و ساخت سرور به‌عنوان یک شاخه کاملا حرفه‌ای در دنیای IT شناخته می‌شود و آماده‌سازی این سیستم‌ها به هیچ‌وجه صرفا به مونتاژ یک سیستم با چند قطعه متداول محدود نمی‌شود. در واقع ترکیب کلی این سیستم‌ها به دفعات و با روش‌های مختلف مورد آزمایش قرار می‌گیرد تا هماهنگی تمام اجزای آن‌ها با یکدیگر تضمین شود. از سوی دیگر، در آماده‌سازی این سرورها از قطعاتی استفاده می‌شود که تقریبا در هیچ حوزه دیگری کاربرد ندارند. برای مثال کنترلرهای RAID مورد استفاده در این سیستم‌ها از چنان عملکرد و البته قیمت بالایی برخوردارند که بهره‌گیری از آن‌ها در یک سیستم دسکتاپ تنها به معنای اتلاف پول کاربران خواهد بود. از سوی دیگر، این سرورها از قابلیت‌های مدیریتی پیشرفته‌ای برخوردارند که به هیچ‌وجه در یک سیستم دسکتاپ مدرن قابل دسترسی نخواهد بود. تمام این عوامل در کنار پایداری و کیفیت بالای سیستم‌های مذکور باعث می‌شوند که این سرورهای استاندارد به شالوده اجتناب ناپذیر هر شبکه حساسی تبدیل شوند. در این مقاله شما را با نمونه‌ای از این محصولات آشنا خواهیم کرد.

Proliant یک نام تجاری برای کامپیوترهای سرور است که در ابتدا توسط شرکت کامپک توسعه یافته و روانه بازار شدند. پس از آن که HP شرکت کامپک را خریداری کرد، به توسعه و عرضه این خانواده از سرورها تحت عنوان HP Proliant ادامه داد. سیستم‌های Proliant در حوزه تعداد واحدهای فروخته شده و درآمدی که نصیب شرکت HP کرده‌اند، پیشتاز بازار سرورهای x86 به‌شمار می‌آیند. این سرورها به چهار خط اصلی از محصولات تقسیم می‌شوند: ML، DL، BL و SL. تفاوت اصلی این سری‌ها به شکل‌ساخت آن‌ها مربوط می‌شود. سری Proliant ML از سرورهای مبتنی بر کیس‌های تاور با ظرفیت توسعه داخلی دیسک‌ها و اتصالات تشکیل شده است. سری DL، سرورهای نصب شونده در رک (Rack Mount) چند منظوره را در بر می‌گیرد. سری BL نیز شامل سرورهای تیغه‌ای (Blade) است که در داخل BladeSystem شرکت HP قرار می‌گیرند. در نهایت سری SL از سرورهای متراکم نصب شونده در رک برای محیط‌های با مقیاس‌های بزرگ تشکیل شده است.

سرورهای Proliant در عین حال از نظر پیکربندی پردازنده‌ها نیز به چند گروه تقسیم می‌شوند. سری‌های 100، 200، 300 و 400 از سیستم‌هایی با یک یا دو سوکت پردازنده تشکیل شده‌اند. سری‌های 500 و 600 شامل سیستم‌هایی با چهار سوکت پردازنده هستند. در نهایت، سیستم‌هایی که هشت سوکت پردازنده دارند نیز در سری 700 قرار می‌گیرند. البته سری جدید 900 که به این مجموعه اضافه شده است نیز دارای هشت سوکت پردازنده می‌باشد و حداکثر از 80 هسته پردازشی و 4 ترابایت حافظه RAM پشتیبانی می‌کند. توجه داشته باشید سیستم‌هایی که شماره مدل آن‌ها به صفر ختم می‌شود از پردازنده‌های اینتل استفاده می‌کنند، از سوی دیگر اگر سرور مورد نظر مبتنی بر پردازنده‌های AMD باشد شماره مدل آن به پنج ختم خواهد شد.

سرورهای Proliant شرکت HP در نسل‌های مختلفی ارایه شده‌اند. آخرین نسل از این سرورها یعنی G8 (نسل هشتم) روز 13 فوریه سال جاری میلادی معرفی شد. با این‌حال هنوز برای بررسی و مطالعه این نسل از سرورهای خانواده مذکور بسیار زود است.

از سوی دیگر، نسل هفتم این سرورها یعنی G7 در حال حاضر به‌عنوان پیشتاز بازار در گروه خود محسوب می‌شود. در این مقاله به بررسی یکی از سرورهای G7 سری DL خواهیم پرداخت که در سال 2011 عنوان پرفروش‌ترین محصول رده خود را به‌دست آورده است. مدلی که در این مقاله به معرفی آن خواهیم پرداخت، Proliant DL380 G7 نام دارد. همان‌طور که قبلا توضیح دادیم، این سرور از نوع نصب شونده در رک است. سری Proliant DL380 همیشه در بین محبوب‌ترین سرورهای چندمنظوره قرار داشته‌اند. از نسل پنجم به بعد، این سرورها بیش از پیش مورد توجه قرار گرفتند و HP با بهره‌گیری از فناوری سطح بالای خود امکانات متنوعی را در آن‌ها پیاده‌سازی کرده است.

نسل هفتم سرورهای DL380 از نظر سخت‌افزاری شباهت زیادی به نسل ششم آن دارد. در واقع شما می‌توانید مدل‌های تقریبا مشابهی از این دو نسل را پیدا کنید. نسل ششم این سرورها بلافاصله پس از معرفی پردازنده‌های زیون سری 5500/5600 اینتل با هسته Nehalem یعنی اواسط سال 2009 معرفی شد. از سوی دیگر، معرفی نسل هفتم بیش از یک سال بعد یعنی با عرضه پردازنده‌های زیون مبتنی بر هسته Westmere هم‌زمان بود که حداکثر حاوی 6 هسته پردازشی بودند. با توجه به این واقعیت که پردازنده‌های زیون سطح بالای سری 5600 از فناوری HyperThreading پشتیبانی می‌کنند، هر یک از این پردازنده‌ها قادر به اداره 12 رشته پردازشی خواهند بود. به این ترتیب هر سرور DL380 با دو پردازنده از این خانواده در مجموع دارای 12 هسته فیزیکی خواهد بود و می‌تواند در هر لحظه تا 24 رشته پردازشی را اداره نماید.

قیمت-سرور-اچ-پی-HP-Server-DL380-G7-Proliant

DL380 از نظر ابعاد در خانواده خود تحت عنوان یک سرور دو واحدی (2U) شناخته می‌شود، به عبارت دیگر این سرور از نظر ارتفاع در یک رک دو واحد را اشغال خواهد کرد. اگر بخواهیم به قابلیت‌های پیکربندی این سرور اشاره کنیم، باید بگوییم که سرور مذکور یک مدل با دو سوکت پردازنده است که می‌تواند پردازنده‌هایی با 2 تا 6 هسته پردازشی را در هر سوکت خود پشتیبانی کند. این سرور همچنین به 18 اسلات حافظه مجهز است. به عبارت دیگر هر سوکت پردازنده 9 اسلات حافظه را در یک پیکربندی سه‌کاناله (سه اسلات برای هر کانال) در اختیار خواهد داشت. شما می‌توانید از ماژول‌های حافظه PC3-10600R RDIMM DDR3 (Registered DIMM) یا ماژول‌های PC3-10600E UDIMM DDR3(Unregistered) در این اسلات‌ها استفاده کنید. در نهایت این سرور قادر است حداکثر از 384 گیگابایت حافظه پشتیبانی کند. برای افزایش امکانات سیستم، شما 6 اسلات توسعه PCI Express را در اختیار خواهید داشت. این سرور به‌طور استاندارد از 8 هارددیسک پشتیبانی می‌کند، اما با یک محفظه درایو ثانویه که بایستی آن را به‌طور انتخابی و جداگانه تهیه کنید، حداکثر قادر به پشتیبانی از 16 درایو SFF SAS/SATA خواهد بود. برای دستیابی به عملکرد رقابتی ساختار ذخیره‌سازی، HP در این سرور خود از کنترلر مجتمع Smart Array P410i بهره گرفته است. برای آن‌که ارتباط سرور با دنیای خارج را فراموش نکرده باشیم نیز باید بگوییم که DL380 G7 به دو کنترلر شبکه 1GbE NC382i مجهز است که هر یک دو درگاه اترنت گیگابیتی را پشتیبانی می‌کنند. به این ترتیب شما روی این سرور چهار درگاه اترنت گیگابیتی را در اختیار دارید.

DL380 G7 از دو منبع تغذیه برای تامین افزونگی پشتیبانی می‌کند. پردازنده‌ها در بخش میانی مادربرد سیستم تعبیه شده‌اند و اسلات‌های حافظه در طرفین آن‌ها قرار گرفته‌اند. این سرور برای به‌جریان انداختن هوای کافی به منظور خنک کردن پردازنده‌ها و ماژول‌های حافظه خود حداکثر از 6 فن 40×60×60 میلی‌متری در یک ردیف استفاده می‌کند. تعویض این فن‌ها به آسانی انجام می‌شود و بدون هیچ لرزشی کار می‌کنند.همان‌طور که قبلا نیز اشاره کردیم، تفاوت نسل هفتم سرورهای DL380 با نسل قبلی آن‌ها به پردازنده‌های ارایه شده با آن‌ها مربوط می‌شود. با این‌حال یک تفاوت مهم دیگر نیز در بین این سرورها وجود دارد. نسل هفتم سرورهای مذکور به همراه نسخه سوم نرم‌افزار مدیریت از راه دور پیشرفته HP یعنی iLO 3 Integrated Lights-Out ارایه می‌شود.

در قسمت جلویی بدنه سرور، شما می‌توانید یک درایو اپتیکال DVD-RW، دو ستون چهارتایی از هارد‌دیسک‌ها که به‌صورت افقی نصب می‌شوند، کلیدهای پاور و ریست، UID (چراغی که به کاربران امکان می‌دهد تشخیص دهند روی کدام‌یک از سرورهای یک رک مشغول کار هستند)، دو درگاه USB، پنل نمایشگر وضعیت فعالیت اجزای مختلف سرور (درگاه‌های اترنت، منابع تغذیه، سطح دما و تغذیه، ماژول‌های حافظه، پردازنده‌ها و فن‌های دستگاه) و یک خروجی VGA برای اتصال نمایشگر را مشاهده کنید. در این بخش همچنین برچسبی تعبیه شده که اطلاعات مربوط به استفاده از نرم‌افزار مدیریت از راه دور iLO روی آن قرار گرفته است.

در قسمت پشت بدنه، شما دو درگاه PS/2، دو درگاه USB، چهار درگاه اترنت گیگابیتی، یک درگاه اترنت پنجم برای نظارت iLO 3، یک خروجی VGA، یک درگاه RS-232، چراغ UID و محفظه‌های در نظر گرفته شده برای دو منبع تغذیه و شش کارت توسعه را مشاهده کنید.

همان‌طور که قبلا نیز اشاره کردیم، شما می‌توانید تعداد هارد‌دیسک‌های این سرور را به 16 عدد افزایش دهید، اما برای انجام این کار باید دریچه سمت راست قسمت جلویی کیس و درایو اپتیکال آن را جدا کرده و سپس یک محفظه مخصوص را برای نصب 8 درایو اضافی به سرور اضافه کنید.علاقه‌مندان به مجازی‌سازی نیز قابلیت‌های مطلوبی را در این سرور به‌دست خواهند آورد زیرا DL380 G7 به یک درگاه USB و اسلات کارت حافظه SD داخلی مجهز است که به آن امکان می‌دهد از یک Hypervisor توکار بوت شود.

در مجموع می‌توان گفت سرورهای Proliant DL380 G7 همه امکانات و مشخصات لازم برای صدرنشینی بر کلاس خود در این بازار را در اختیار دارند. آزمایش‌های مختلفی که روی این سرورها انجام شده‌اند نشان می‌دهند که سیستم‌های مذکور عملکرد خنک و کم‌مصرفی را ارایه می‌کنند.

این سرورهای چندمنظوره به آسانی می‌توانند نیازهای متنوع هر محیطی با حداکثر 80 کلاینت را برآورده نمایند. به همین دلیل مجموعه گسترده‌ای از شرکت‌ها و سازمان‌ها می‌توانند این گزینه را در بالای فهرست گزینه‌های خود قرار دهند.

هیچ تردیدی نیست که DL380 G7 با در نظر گرفتن بالاترین ملزومات برای یک سرور چندمنظوره طراحی شده و یک پایه استوار برای شبکه شما به‌شمار می‌آید، در حالی‌که به شما امکان می‌دهد از آخرین فناوری پردازنده‌های زیون اینتل به همراه قابلیت‌های مدیریت از راه دور شرکت HP به‌آسانی بهره‌گیری نمایید.

برای خرید و قیمت گیری کلیه سرور های HP با ما تماس بگیرید.

شماره تماس: 88884268


آخرین دیدگاه‌ها

    دسته‌ها