نصب و راه اندازی HP LeftHand
Category : تجهیزات HP سرور Server
This paper vera certain generic configurations that allow these cabins HP SAN HP Lefthand calls, This case is made by a virtual booths under a VMware, and for working smoothly in an environment much more flexible laboratiorio. HP has several models cabinas Lefthand físicas, all with the same system, but with different capacities, Disk models, bocas ethernet… serían la serie HP LeftHand P4500 y HP LeftHand P4300. But also for production environments has the virtual cabin HP LeftHand P4000 Virtual SAN Appliance o VSA.
In this document we will see the main features of the cabins, such as the Storage clustering (gives higher performance and capacity), Network RAID (greater availability of data), Thin provisioning (reduces costs and improves the utilization of disk capacity), iSCSI (Ethernet technology) Snapshots and replication using Remote Copy (for local or remote replication, to improve the protection and availability of data).

This is the scenario that will be mounted in the wake of this document, be mounted four cabins SAN HP Lefthand, will create a multisite cluster type, create a LUN, RAID network configure replication to see that senses going and what it means, LUN’es to present the host. You will see how to create a snapshot of the LUN to use as a backup or dump it on another LUN, to use the SmartClone… what we need are as iSCSI across a private network environment where they will be booths and legs ethernet hosts that want to connect to them, clients / positions must not be connected to this network. The network should be at least 1GB to be supported and ideally have a 10Gb iSCSI network!

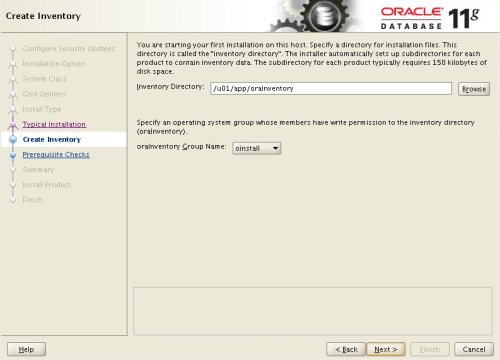
Good, we started the first cabin, have little configuration, with agregarles management IP address we would be better. So we started and when we asked for a login ‘start’.

We press the Enter here the “Login”,

And we will “Network TCP/IP Settings” > “eth0”, select “Use the following IP address” and specify the IP address for this cabin. “OK”,

“OK” to save changes,

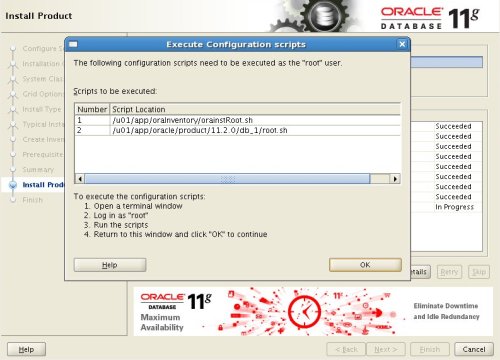
“OK”, and with this we completed the minimum set in the cabins HP Lefthand.
Now what we have to do is connect to manage booths, we will use the Management Console calling cabs “HP LeftHand Centralized Management Console” the “HP LeftHand CMC”.
Instalando HP LeftHand Centralized Management Console,
The need to install Windows on a computer that is connected to the iSCSI network, and that management is on the private network iSCSI.

Installation is a simple wizard, we follow and have the console installed to manage our cabins independently or general level by the Management Group. “Next” to start the wizard,

Accept the license agreement “I accept the terms of the license Agreement”, “Next”,

Select custom installation marking “Custom” & “Next”,

Selected “Application” to install the console, optionally “SNMP Support” SNMP to audit with booths and “Documentation” for that, documentation & help. “Next”

Select the installation path, by default: “C:Archivos de programaLefthand NetworksUI”, “Next”,

If we icon…

If we want to open the console to finish & Miscellaneous,

A summary of the installation and click “Install” to finally start the installation of the management console,

… wait a few seconds while installing…

Ready!

Open the console “HP LeftHand Centralized Management Console”

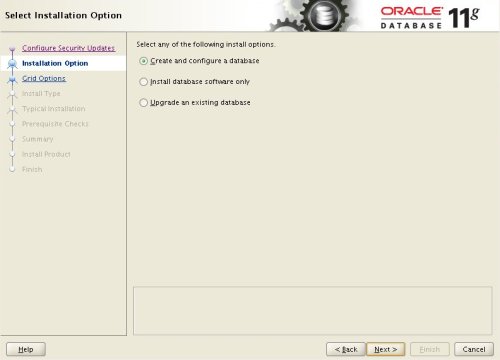
If this is the first time we open this console, we need to configure, namely, add storage arrays, create a group the various management groups, create a cluster, or create a LUN. All this we can do by attending. So first we have to add the cabins from “1. Find Nodes Wizard”

“Next” to start the wizard,

We can search the cabins for fixed IP address, name or directly we make a broadcast on the network to look for, I choose the first option, more comfortable.

From “Add…” add the IP range where are my cabins, and frame option “Auto Discover” So the next time you open the console I automatically save these cabins on the console, press “Finish”,

Well, We detected four cabins, with their names, IP’s… click on “Close” to close the wizard.

Then hit “2. Management Groups, Clusters and Volumes Wizard” to create, first administrative group to manage booths, second, create a cluster between interests us and the type that we are interested. And finally (optional) create the LUN’s.

“Next” to start the wizard,

We create a management group to our environment from “New Management Group” & “Next”,

We indicate the group a name and select booths belonging to want this administrative group, In principle it is interesting to add all cabs to work with them,

We create a username and a password to protect this administrative group, to only authorize us or who can manage, “Next”,

Configure group time, the interesting thing will be to use an NTP server on the network that have (un firewall, a domain controller…), in my case I set it up manually from the second option, “Next”,

Well, Here we set the type of cluster that we; if only we will have a site, location, select one “Standard Cluster”, in return, if we have at least two sites, physically separated, select one “Multi-Site Cluster”. In this paper we will multisite cluster,

We give a name to the cluster and select cabins (o storage node) we want to participate in balancing the information with our organization, selected in principle all,

But now we must set (if we) sites, or physical locations, for proper administration, so click on “New…” to create sites,

In my case I will create two sites and cabins will associate a site adding them to your location. Eye, must have the same cabin somewhere in the other sites, and of course the same model.

Well, shows no cabins available and teaches us that we have configured sites, “Next”,

We add from “Add…” an IP address (Virtual IP) for the cluster, that is where we connect to our iSCSI iniciaciadores,

Indicate an IP address and a netmask, “OK”,

The wizard also asks us if we want to create a volume and, a LUN, this is optional, but I prefer to do it later as it is not that I have neither space! So frame “Skip Volume Creation” & “Finish”,

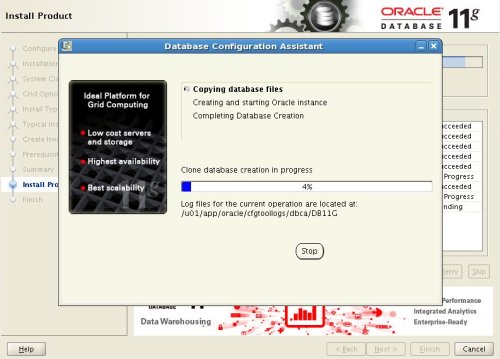
… waited a while while creating the management group, unites all canbinas, creates the cluster…

Once, click on “Close” to manage this new environment.

Here we have the Management Group, with the cluster, nodes, and all settings that could manipulate,

If we want a computer to connect to our volumes or our LUN’es, first we have to discharge the initiator of that team, for this, we will “Servers” and Right “New Server…”

This Get, allow this computer to access the LUNs I tell you later, is a type to aliases, indicate their name, description, if it reads give access via iSCSI on, if we want to use the load balancing (that do not support all initiators), if we want to use CHAP on the, and the name of the originator or Initiator Node Name. The iSCSI initiator name you can get from the host properties that will be attached to cars. “OK”,

Las cabinas HP Lefthand, Managers need to have all the data correctly replicated cabins, to communicate with the storage cabinets,or fall to withstand different nodes… Being number quorum = n; N = Number of managers + 1. Manager is a process which controls the environment, associated with a management group. It is recommended that the number of Managers is odd, namely,in the configuration I have now, I have four cabins with manager initiated in each, Debere start a manager more, and I have the option (less desirable) de usar a Virtual Manager (that run under one of the cabins) and only be lifted manually and after dropping one of the nodes, so do not miss the quorum. Or else, have the option of using a Manger Failover, that this should be a part of the booths (advisable) at a third site (or at least network separate booths), yes would rise automatically when a fall from a node. This runs on a virtual machine in VMWare ESX or is a VMware Server.
So achieve that if a node drops, or two; have 3 manager’s raised and you can continue working on the current status of our organization and quorum remains.

And would select which node we want the Virtual Manager.

Good, we will create a volume, a LUN, order subsequently to iSCSI initiators and can work with our cabins share alamcenamiento. From “Volumes and Snapshots” with right “New Volume…”

Tab “Basic”, indicate the name of the volume, a description, a size that we want to give and that is what we want to present servers from “Assign and Unassign Servers…”. We recommend creating a volume with the size needed, because then you can resize and make it smaller or larger is very simple.

Select the server you want to see this record, mark “Assigned” and select the permissions you want to have, indicated for full access “Read/Write”, “OK”,

Tab “Advanced” important to indicate the type of replication that we want this LUN between nodes or cabins that is a characteristic of this type of cabins (see the image below for more detail). In addition to setting the priority of replication between the cabins “Availability” or availability “Redundancy” or redundancy. And the type of LUN, is primary or remote

The type of replication indicates how many times the data is to be copied, namely, 2-Way indicates that the information is duplicated, 3-The info will be tripled Way and 4-Way will cuatriplicada. Now, depends on the nodes that have to follow the patterns of writing, for it is better to seek our case. As we shall see, to have higher levels of replication, more room will be reserved, more we occupy our information but we will be much more protected.

This is the aspect of the newly created LUN.

On a volume, we can create snapshots or snapshots, to stay in a fixed point and could go back at any given time, losing the information that has been written subsequently. Or directly to rely on them to back serguridad (remote), we also present these snapshots to teams if our interest. To manually create a snapshot volume right “New Snapshot…”

We indicate the name of the snapshot, default uses the terminology of two SS to indicate that it is a snapshot. “OK”.

And these would be the options we have on a snapshot, Roll back the interesting 😉

We can see the performance of the cabins, or any member of our organization since “Performance Monitor” can add or remove counters to our graph.

Or for example, from “Use Summary” we can see a graph where the actual uses of our data, data reserved (or provisioned), but these snapshots, what is not used, the total size, Thin Provisioning or would use instead of the LUN Full’d see that I have different information.

The above, snapshots can do remotely, namely, they can be put in a volume, for this, volume on right “New Remote Snapshot…”

We have to keep the points we asked, first, click on “New Snapshot…” to create the snapshot,

Same as above, first create a snapshot, we name, “OK”,

And now we must specify a remote volume displaying the combo, if we do not have, will have to create one from “New Remote Volume…”

“Next” to select the management group,

Existing cluster (“Existing Cluster” & “Add a Volume to the Existing Cluster”), “Next”,

In this cluster, that automatically discovers, “Next”,

We put a name to this volume, and if we want to have replication or not your content, “Finish”,

We confirm and “Close”,

Now, we give “OK” and we will create a snapshot of the source volume and we will mount / copy as if it were another volume.

After a while of copies and replicas of information, see that we would have two volumes with the same information,

We can use another feature of the HP Lefthand cabins to create volumes SmartClone, this is to save space in our cabins. A practical example, if we have teams (servers x example) with the same base system, create a LUN for it, install the operating system on it and configurations necessary, this will occupy (2Eg Gb), if we have 10 2Gb for servers using the same information we are wasting 20Gb. The idea is to create a volume with this setup and create SmartClone, each server to use only the information you need using the base disk; each server and store your information in your individual LUN, without having to duplicate information senseless.
Good, for this, on a volume and with the information we want to use the other teams, Right “New SmartClone Volumes…”

First we make a snapshot “New Snapshot…”

Ditto, “OK”,

We indicate how we want to call this volume basis, the type that will supply the volumes that we create, for these environments is recommended to use “Thin”, and not “Full” to occupy what is used (so we can create more volumes with size not have available, very dangerous but can, may). Selected servers (iSCSI initiators) we want to see each SmartClone and permissions (the example graph is not adequate, since I did not have more teams to make the sample). We “OK”,

And if we go back to the graph before, see (in my case) or we are going to use more space than we dispobible! (eso es Thin Provisioning). Full Provisioning reserve all the space we assign a LUN, although not used.

Well, we can get through all the tabs you need console can also get information from our hardware, the status of their connections…

And if we drop a cab and have raised the Virtual Manager (o el Fault Manager) we will see how we can support simultaneous fall to two nodes at once.

To connect to this storage, if possible we will use the iSCSI initiator that provides HP Lefthand, since it allows a better balancing of the connections, although only for Windows, HP MPIO Lefthand DSM Dynamic Load Balancing, do dynamic balancing of obtaining data from different connections cabins. However with a traditional iSCSI initiator such as Microsoft iSCSI Initiator, redirected by asking the host cluster and bringing more liberated (Virtual IP Static Load Balancing).


آخرین دیدگاهها