نصب VCSA 6 vCenter Server Appliance
Category : دستهبندی نشده
نصب VCSA 6 vCenter Server Appliance
معرفی
در این پست می خواهیم به نصب و پیکربندی اولیه سرور VCSA 6 بپردازیم. در محیط های vSphere نیاز هست تا از آخرین ورژن سرور vCenter استفاده کرد بدین منظور مدیران شبکه های مجازی مبتنی بر VMware نیاز دارند تا آخرین نسخه VCSA را نصب کنند یا نسخه فعلی خود را بروزرسانی نمایند.
با استفاده از VCSA شما می توانید براحتی تمامی منابع سروری خود را مدیریت کنید و همچنین مدیریت ایجاد و حذف ماشین های مجازی در این نسخه از vCenter بسیار آسان می باشد.
شرایط موجود
در این لابراتوار آزمایشی ، ما دسترسی کامل به کلاستر vSphere 5.5 مبتنی بر Cisco UCS و استوریج های NetApp و PureStorage و چندین سرور ESXi و یک سرور vCenter خواهیم داشت. با توجه به اینکه ما از vSphere 5.5 که بصورت Nested نصب شده است استفاده می کنیم قصد داریم نرم افزار vCenter Server Appliance 6 نصب بکنیم.
نیازمندیها
اگر شما قصد ساخت nested vSphere خود هستید می توانید با نیازمندیهای انجام این کار آشنا شوید. در نظر داشته باشید که این نیازمندیها بر حسب نیاز ما در ساختار تستی خود برآورد شده است در اینجا برای 3-5 هاست و 50 عدد ماشین مجازی در نظر گرفته شده است. اگر قصد استفاده از هاست ها و ماشین های مجازی بیشتری را دارید Sizing را تغییر دهید.
- سیستم ویندوز به همراه یک مرورگر سازگار با نرم افزار VMware Client Integration Plugin 6.0
- ساختار vSphere موجود برای راه اندازی ماشین های جدید
- حداقل منابع مورد نیاز : 2vCPUs, 8GB, 120GB HDD
- چک کردن از طریق سایت http://kb.vmware.com/kb/2106572
- منابع مورد نیاز برای هر هاست ESXi شامل 2 vCPUs, 6GB (4Minimum) Memory, 15GB (4GB Minimum) storage
First Steps
Before starting any installation you have to mount the vCSA 6.0 .iso to the system that you want to use for the installation process. I’m using virtual CloneDrive to mount it to my system (burning a DVD and sending it by mail to our datacenter is a bit too old fashioned and slow, I think).
Heal Your vSphere
Installing the VMware Client Integration Plugin
As the vCSA 6.0, vCenter Server Appliance, is no longer available as an .ovf I had no other choice than downloading the .iso and use the VMware Client Integration Plug-In for the deployment process.
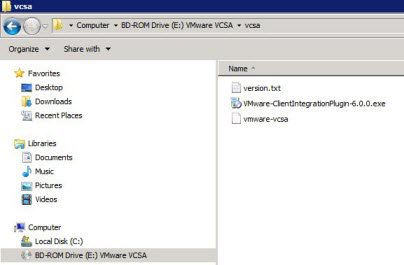
Good newsThe VMware Client Integration Plug-In contains the vCSA-Install Media, so no need to search and download additional software. It’s a simple MS Windows installation process. Please note that I had trouble using Chrome as a browser when trying to use the Plug-In so I switched to firefox for this installation (personally, I don’t like IE, so switching to firefox was obvious for me). The installation of the VMware Client Integration Plugin is pretty easy. It is located in the Folder “vcsa” on the .iso and in my case it’s called VMware-ClientIntegrationPlugin-6.0.0.exe.
Once started it is a typical windows installer procedure, accepting the EULA and deciding were to install the plugin.

Installing the vCSA 6.0
To start the installation just change to the root directory of the .iso content and open the vcsa-setup.html with the browser of your choice (in my case it’s Firefox as Chrome didn’t work).Please make sure that the plugin is allowed to run (most browsers will ask you, but it’s also be possible that you have to allow it in the settings of your browser), typicall the page refreshes after some seconds. If you weren’t quick enough (as me, because I made all those nice screenshots for you guys), just refresh manually and the plugin welcomes you with the decision of either install from scratch or upgrade an existing installation.In my case I chose the initial installation.

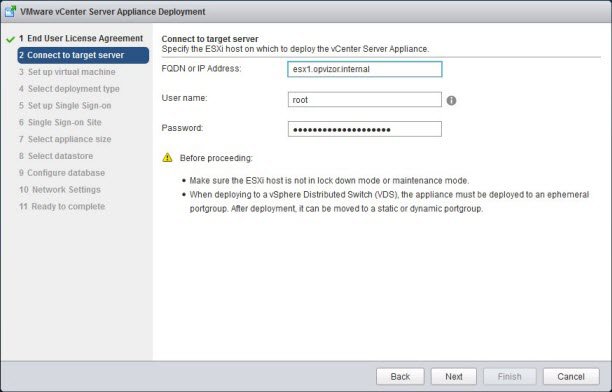
Connect to target server
Since the vCSA is deployed directly to an ESX-host, we have to connect to one and enter the credentials. I was running into an error “Cannot authenticate to the target server.” using the FQDN I had to replace it using the IP address of the host. The cause is a reverse lookup made by the installation routine. As we don´t need that in our demo environment the installer didn’t like that and I had to use the IP address.
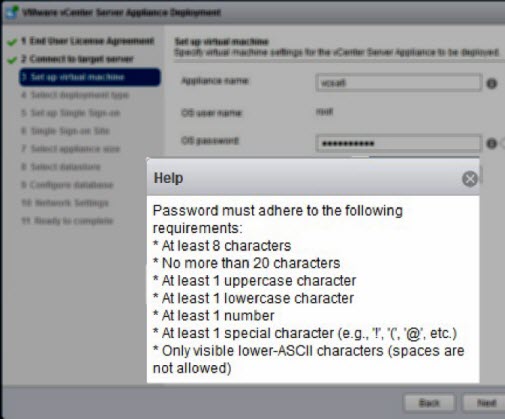
Set up virtual machine
Now it’s about giving the vCSA virtual machine a name and set the root-password. For the name in my case it’s just vcsa6 (I like to keep it simple and it’s easy to remember/assign it while already having 5.1 and 5.5 in place). You need to keep the requirements in mind when setting the password. Please note that you will be able to login to the appliance using the root account with the vSphere Webclient as all permissions are needed! Later on the main purpose of that account is administrative access to the vCSA (via console/SSH/…) as you should create another user for the vCenter access later on.
Select deployment type
In vSphere 6, VMware introduced the “Platform Services Controller” (short: PSC). It offers shared services such as Single Sign-On, Licensing and Certificate Management. Please note that it is mandatory to have at least one PSC! It´s also possible to deploy one or more external PSCs. In my case (remember: Keep it simple) I creat just one embedded PSC.

Set up Single Sign on
Now it’s all about setting up an administrative account and a SSO domain + site. As everything is brand new, I don’t have an exisiting domain that I want to use. I just went for a new SSO Domain and call it vsphere6.local. For the SSO Site name it will be Default-First-Site. Please note that for now this user is the one with administrative privileges within your vSphere domain.
Select appliance size
In my case it’s very unlikely that it will host either more than 10 hosts or 100VMs, “Tiny” is totally fine for appliance size.

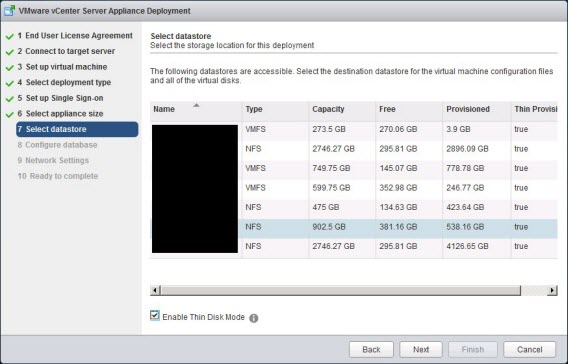
Select datastore
Selecting the datastore at your choice. The most important thing for me is to activate thin provision mode. When not using thin mode, the whole storage space assigned will be consumed instead of only consuming the storage which is really in use.
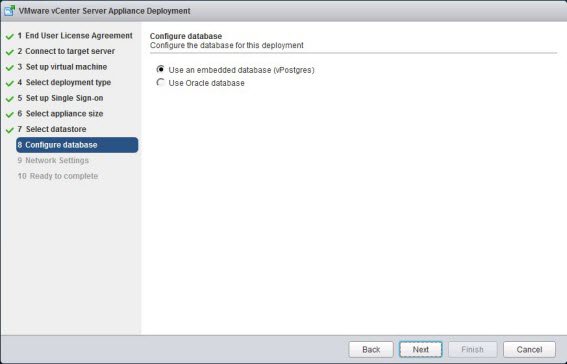
Configure database
For the databasekeep I’m using the embedded vPostgres DB. Running an external oracle database would just make it more complex and creates more stuff I need to take care for.
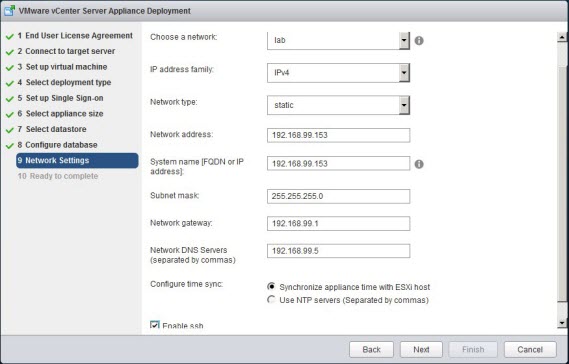
Network Settings
I already have an existing portgroup in my lab for the testing the infrastructure and reserved an ip address for the vCSA and the ESXi hosts. Additionally to the default network settings in the vCSA I activated SSH. This is not recommended for production use, but always nice to have when playing for testing purpose. When using an IP over a FQDN, the system shows a warning as this setup is not recommended. That’s fine for me. Again not recommended for production.
Ready to complete
The configuration is ready to go. A quick summary is shown with the request to proceed. I’m ok with all the settings and deploy.
VMware vSphere and more
Get more information about VMware topics
Installation Complete
The deploy process of the vCenter Server Appliance took me about 15 minutes. Don’t worry if the installation process takes more time. Please remember I downloaded the appliance directly to our datacenter and I’ve been working via Remote connection. No slow landline- or desktop-connection in between my computer an the datacenter during the installation process.
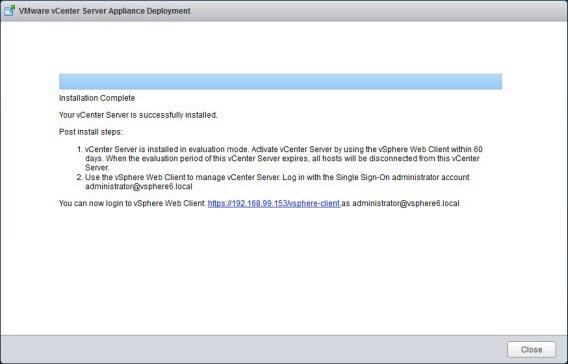
Remember to run a Opvizor Health Check on your vSphere environment, when the vCenter Server Appliance is up and running. Sign Up for Health AnalyzerStart installing the first VM for a nested vSphere ESXi 6.0

آخرین دیدگاهها