بررسی سرور HP ProLiant DL180

بررسی سرور HP ProLiant DL180

بررسی سرور HP ProLiant DL180

بررسی سرور HP ProLiant DL180

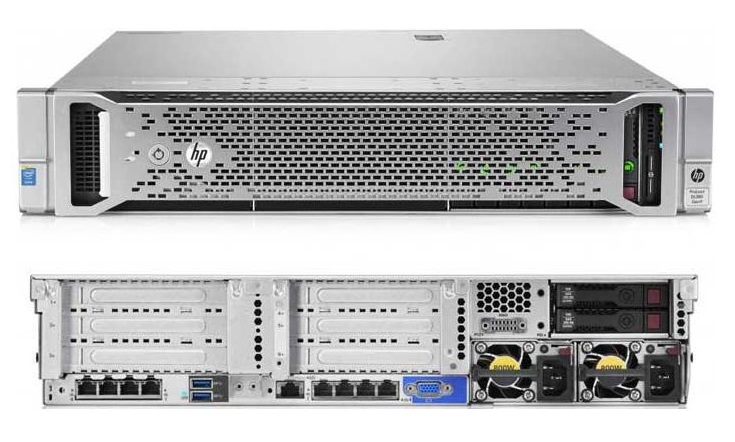
انتخاب سرور مناسب برای سازمان و کسب و کارتان مسئله ای مهم و اساسی است، در این مقاله قصد داریم به معرفی یکی از سرورهای نسل 9 اچ پی بپردازیم؛ سرور HP ProLiant DL180 که به گونه ای طراحی شده تا عملکرد و قیمت مناسب را باهم ترکیب کند و با انعطاف پذیری بالا قابل پیکربندی با طیف گسترده ای از دستگاه های ذخیره ساز می باشد.

HP ProLiant DL180
سروری است که هدف از طراحی آن ترکیب عملکرد بالا و قیمت مناسب بوده، این سرور همچنین طیف گسترده ای از دستگاه های ذخیره ساز را پشتیبانی می کند و به شما گزینه هایی ارائه می دهد تا انعطاف مورد نیاز برای اجرای برنامه های وابسته به فضای ذخیره سازی را داشته باشید.

ساخته شده برای طیف گسترده از پیکربندی ها و گزینه های ذخیره سازی وکنترل ذخیره سازی که این ویژگی سرورها را قادر می سازد تا موارد زیر را پشتیبانی کنند:
پشتیبانی از محدوده وسیعی از workloads (بارکاری) ذخیره سازی در مراکز داده کوچک تا بزرگ
پشتیبانی از file serving
پشتیبانی از ذخیره سازی ویندوز (Windows storage)
پشتیبانی و اجرای برنامه های داده ای بزرگ از قبیل Apache Hadoop؛ چیزی که نیاز به ترکیب مناسبی از ذخیره سازی و محاسبات دارد.

مشخصات
پردازش و محاسبات: (Up to 2 Intel® Xeon® E5-2600 v3 Series, 4/6/8/10/12 Cores, PCIe 3.0, up to 6 available slots)
حافظه: (HP SmartMemory (16) DDR4, up to 2133 MHz (512 GB max
ذخیره سازی: Standard HP Dynamic Smart Array B140i, optional HP Smart Array Controllers, and HP Smart HBAs via PCIe stand-up cards
مشخصات شبکه: Embedded 2x 1GbE, optional FlexibleLOM slot on riser

سرور ProLiant DL180 به جز برای زیر ساخت های پایه IT بسیار ایده آل است برای کاهش هزینه های اجرای برنامه های وابسته به فضای ذخیره سازی مانند cold storage و back-up.


نرم افزار رایگان HP OneView

نرم افزار رایگان HP OneView

همیشه برای من این سئوال بود که آیا استفاده از نرم افزار HP OneView شامل هزینه و یا خرید لایسنس می باشد.

این نرم افزار بصورت رایگان می باشد و از ورژن 1.2 که در پایان سال 2014 منقضی شده است می توان استفاده کرد و در آن می توان سرورها را به این نرم افزار اضافه نمود و مدیریت و مانیتور نمود.

در حالت Monitored Mode ما نیازی به لایسنس نداریم و شرکت HP به این حالت لایسنس استاندارد اطلاق می کند که بصورت رایگان می باشد.

در حالت Managed Mode که به لایسنس OneView Advanced نیاز دارد کلیه قابلیتهای ارائه شده در این نرم افزار را ارائه می دهد.

OVmonitoring-1

همانطور که در جدول بالا می بینید قابلیتهای کلیدی مانند مانیتورینگ ، Map View ، Reporting و دسترسی REST API در این نرم افزار ارائه می شود و استفاده از این نرم افزار در Server Farm های HP پیشنهاد می شود.

برای مدیران شبکه ای که از این نرم افزار استفاده نمی کنند به شدت پبشنهاد می شود تا استفاده از نسخه Monitored Mode این نرم افزار آغاز کنند و زمانی که کل ساختار خود را مانیتور کردند می توانند به سمت حالت Managed Mode این نرم افزار حرکت کنند.

این نرم افزار بصورت Per Server  و یا Per Enclosure تهیه می شود و می تواند قابلیت مدیریت و کنترل کلی محیط سرورها به انضمام Virtual Connect و Firmware patch management را در اختیار کاربر قرار می دهد.

به این نکته باید اشاره نمود که در حالتی که شما یک شاسی Blade Enclosure را در حالت Monitored Mode اضافه می کنید مدیریت Virtual Connect توسط Virtual Connect Manager VCM ساخته شده بر روی ماژول های VC انجام می گیرد. اضافه کردن یک شاسی Enclosure در حالت Managed Mode نرم افزار VCM را بلاک می کند و با نرم افزار OneView Control تعویض می شود.

شکل زیر صفحه افزودن سرور و یا Enclosure در حالت Monitored Mode را نشان می دهد.

OVmonitoring-2

آدرس IP مربوط به iLO را به همراه Username/Password وارد نمایید.

در حالت Managed Mode از شما در مورد انتخاب Enclosure Group که در OneView قبلا ایجاد شده است سئوال می کند و همچنین باید یک پیکربندی Virtual Connect به مفهوم Logical Interconnect Group LIG برای اضافه کردن انتخاب شود.

در قسمت پایین به فعال بودن Firmware Baseline نیز اشاره می کند.

OVmonitoring-3

زمانی که Enclosure شما به نرم افزار اضافه شد شما می توانید تفاوتهای موجود میان تیغه های مختلف را مشاهده کنید. تصویر زیر نمونه ای از یک تیغه اضافه شده در حالت Monitored Mode می باشد.

OVmonitoring-4

همانطور که مشاهده می کنید تنها پورتهای NIC با کارتهای Mezzanine قابل مشاهده می باشد و هیچ پیکربندی شبکه ای انجام نشده است و همچنین هیچ اطلاعاتی مربوط به Utilization سرور تا لحظه ای که لایسنس iLO Advanced بر روی پورت iLO سرور بلید ست نشده است قابل مشاهده نخواهد بود.

در حالت Managed Mode اطلاعات بسیار زیادی در اختیار کاربر قرار می گیرد.

OVmonitoring-5

در حالت Monitored Mode نیز که استفاده از آن هیچ هزینه ای ندارد می توانید ابزار این نرم افزار را برای محیط های VMware و Hyper-V از آدرس download and install the OneView appliance دانلود و استفاده نمایید.

نکته قابل توجه اینست که مدیریت 3PAR که شامل ایجاد و مدیریت Volume و Snapshot ها می باشد از طریق ورژن رایگان OneView قابل انجام می باشد و از طریق ورژن Managed نیز حتی می توان Volume ها را در میان Server Profile ها اضافه نمود.

نکته بسیار مهم برای کاربران عملیاتی این نرم افزار این است که شما باید از یک نرم افزار واحد در این ساختار استفاده نمایید به این مفهوم که اضافه کردن تعدادی سرور در حالت Monitored و تعدادی دیگر در حالت Managed کاملا اشتباه می باشد. برای مثال شما می توانید کل یک Enclosure را به نرم افزار اضافه کنید و نه بخشی از آن را و این وظیفه Virtual Connect می باشد.

در یک سیستم عملیاتی نمی توان قسمتی از سرورها را با نرم افزار VCM و قسمتی دیگر را با نرم افزار OneView مدیریت نمود.


گروه فنی و مهندسی وی سنتر ارائه دهنده کلیه محصولات و راهکارهای HP آمادگی خود را برای تامین کلیه نیازهای مشتریان اعلام می دارد.

شماره تماس: 88884268


  • 0

نصب Active Directory بر روی 2008

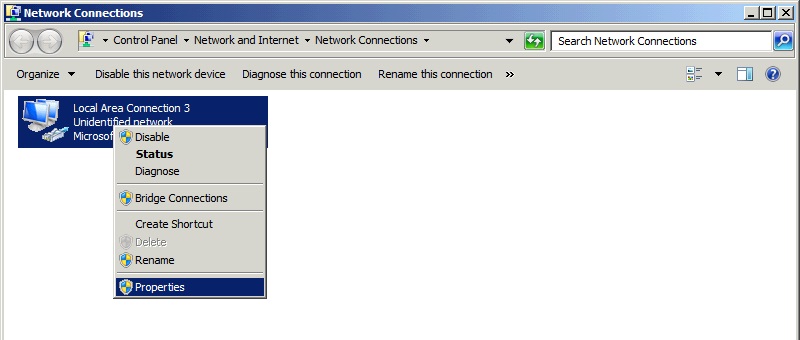
بر روی کارت شبکه راست کلیک کرده Properties را انتخاب کنید:

نصب-Active-Directory-بر-روی-2008-1

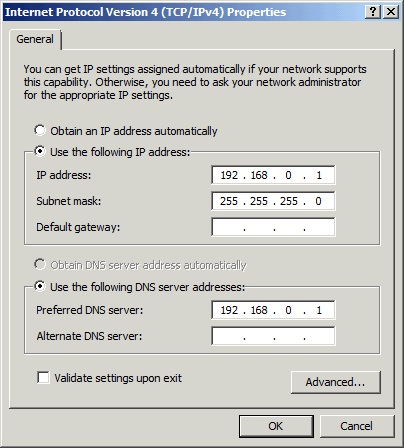
در سربرگ Networking گزینه Intrenet Protocol Version4 را انتخاب کرده و Properties را کلیک کنید. در سربرگ General تنظیمات TCP/IP مربوط به کارت شبکه رو وارد کنید.
نصب-Active-Directory-بر-روی-2008-1

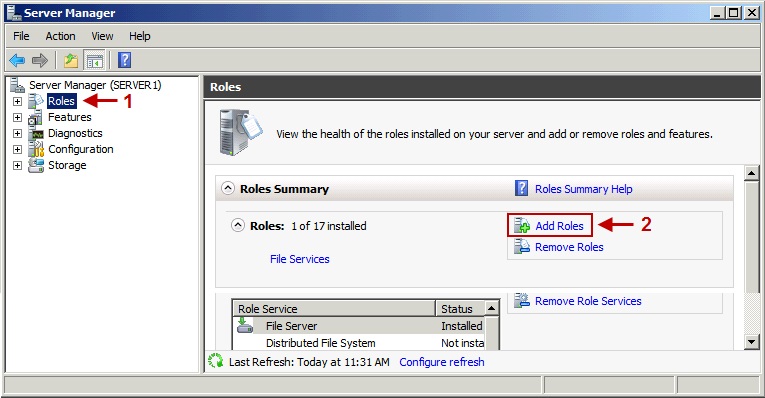
وارد مسیر Start> Administrative Tools> Server Manager شوید. در صفحه Server Manager گزینه Roles را انتخاب کرده و سپس Add Roles را کلیک کنید.
نصب-Active-Directory-بر-روی-2008-1

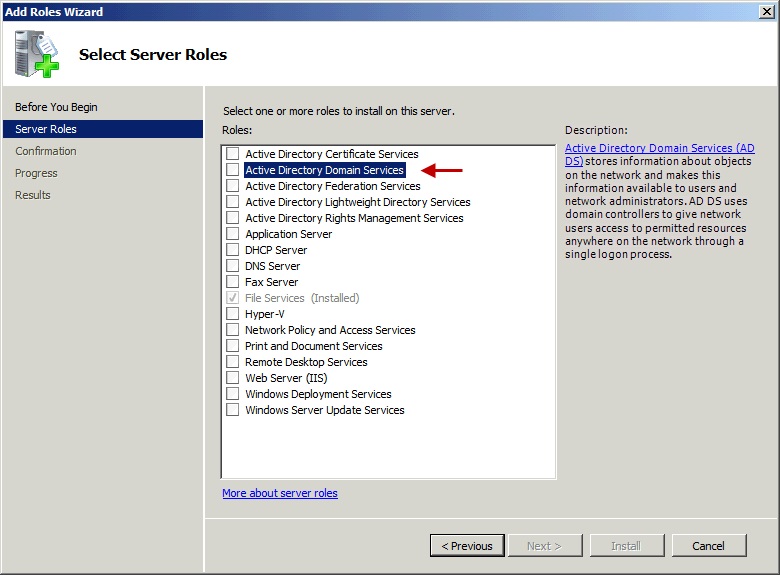
در صفحه Before You Begin دکمه Next را کلیک کنید. در صفحه Select Server Roles گزینه Active Directory Domain Services یا همان ADDS را انتخاب کنید.
نصب-Active-Directory-بر-روی-2008-1

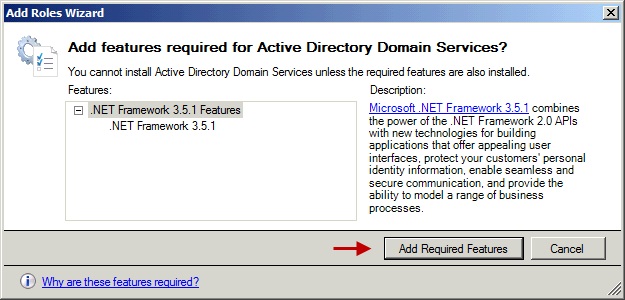
پس از انتخاب کادری ظاهر خواهد شد که به شما Feature هایی که برای نصب ADDS نیاز است نشان می دهد. گزینه Add Required Features را کلیک کنید. در نهایت Next را کلیک کنید.
نصب-Active-Directory-بر-روی-2008-1

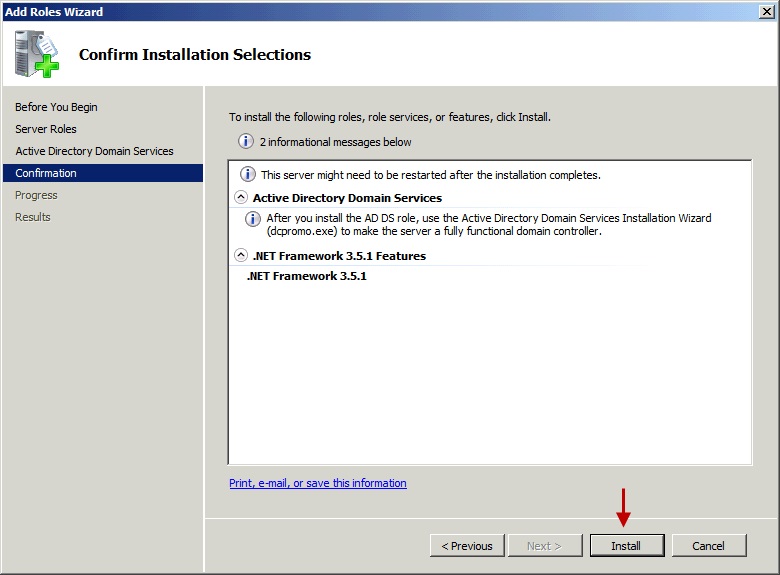
صفحه Active Directory Domain Services توضیحاتی در رابطه با سرویس Active Directory و موارد دیگر را به شما نشان می دهد. پس از مطالعه دکمه Next رو کلیک کنید. در صفحه Confirm Installation Selections گزارشی در مورد سرویس Active Directory که نصب خواهد شد به شما نشان داده می شود. دکمه Install را کلیک کنید.
نصب-Active-Directory-بر-روی-2008-1

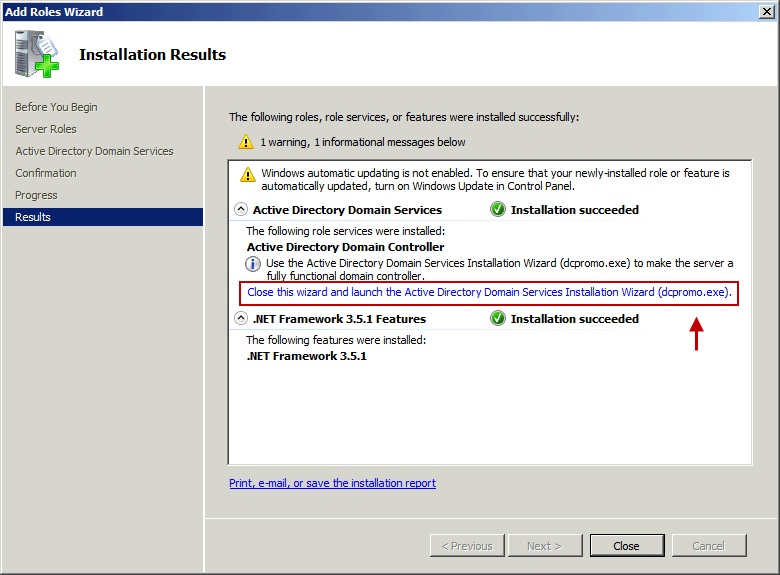
در نهایت صفحه Installation Results نمایش داده خواهد شد که نشان دهنده نصب صحیح Role موردنظر است. حال برای کامل کردن نصب سرویس ADDS نیاز به پیکربندی ADDS دارید. برای این منظور در همان صفحه link آبی رنگ را کلیک کنید و یا صفحه را ببندید و در مسیر Start> Run دستور dcpromo.exe را اجرا کنید.
نصب-Active-Directory-بر-روی-2008-1

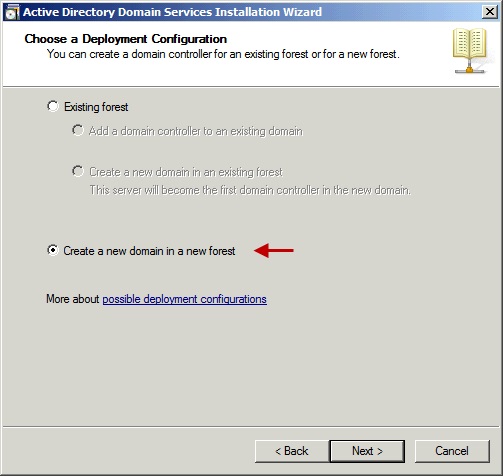
در کادر باز شده Next را کلیک کنید. در صفحه Operating System Compatibility دکمه Next را کلیک کنید. در صفحه Choose a Deployment Configuration گزینه Create a new domain in a new forest را انتخاب و Next را کلیک کنید.
نصب-Active-Directory-بر-روی-2008-1

در صفحه Name the Forest Root Domain نام دامنه خود را انتخاب و Next را کلیک کنید. در اینجا MICROSOFT.COM
نصب-Active-Directory-بر-روی-2008-1

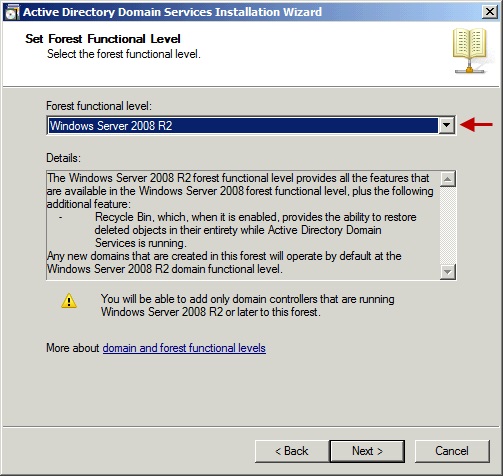
پس از بررسی نام دامنه و تنظیمات از طرف سیستم، کادر Set Forest Function Level ظاهر خواهد شد. در قسمت Forest Function Level گزینه Windows Server 2008 R2 را انتخاب کنید.
نصب-Active-Directory-بر-روی-2008-1

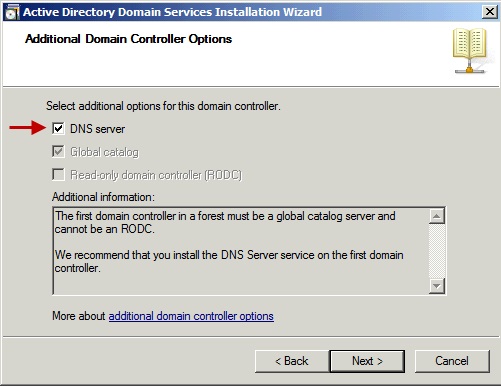
در صفحه Additional Domain Controller Options گزینه DNS انتخاب شده باشد. در این صفحه سه Option وجود دارد که در هنگام نصب و راه اندازی هر Domain Controller می توان انتخاب کرد. خلاصه ای از این سه Option:

الف) DNS: در کوتاه ترین و ساده ترین تعریف (DNS (Domain Name System یک ساختار سلسله مراتبی است که عمل Name Resolving را انجام می دهد. یعنی آدرس IP معادل هر FQDN یا Domain Name را برمی گرداند و بالعکس. به خاطر بسپارید که (Active Directory (AD برای پیاده سازی و انجام وظایف خود حداقل به یک سرویس DNS نیاز دارد. پیشنهاد می شود سرویس DNS در ماشینی که DC (یا همان اولین DC در Forest) راه اندازی شده است نصب شود.

ب) (Global Catalog(GC : نوعی DC است به این ترتیب که یک کپی از تمام اشیاء (Active Directory Forest (AD Forest را در خود نگهداری می کند. یکی از مزیتهای آن دسترسی سریع به تمام اشیاء از طریق همه DC ها در Forest است. اولین DC که همان Root DC است همیشه Global Catalog نیز خواهد بود. همان طور که می بینید در صفحه Additional Domain Controller Options به صورت خاکستری انتخاب شده است

پ) RODC: یا Read Only Domain Controller نوعی DC است که یک کپی از تمام اشیاء و صفات در دامنه را به صورت فقط خواندنی نگهداری می کند.به دلیل اینکه اولین DC در Forest باید Writable باشد پس این گزینه نیز به صورت انتخاب نشده و خاکستری رنگ نشان داده شده است.
نصب-Active-Directory-بر-روی-2008-1

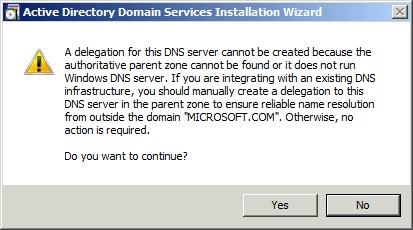
پس از کلیک دکمه Next کادری نمایش داده خواهد شد. دکمه Yes را کلیک کنید.
نصب-Active-Directory-بر-روی-2008-1

در صفحه بعد محل ذخیره سازی پایگاه داده ها و فایل ثبت وقایع و همین طور فایل SYSVOL در AD نشان داده شده است. در محیط واقعی از درایوی به غیر از درایو سیستمی برای ذخیره آنها استفاده کنید. در صفحه Directory Services Restore Mode Administrator Password کلمه عبور را برای Logon در حالت Restore Mode به DC انتخاب کنید.

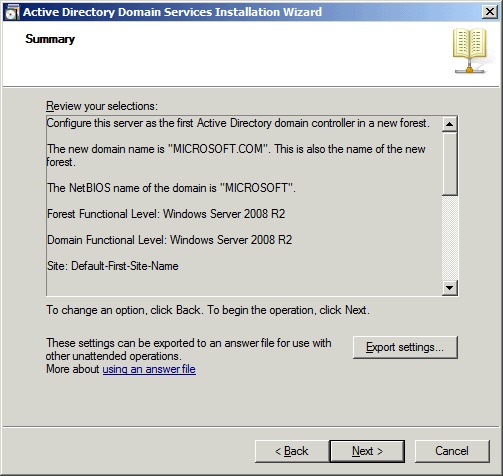
در صفحه Summery گزارشی از تنظیماتی که در نظر گرفته اید نمایش داده خواهد شد. دکمه Export Setting برای ذخیره این اطلاعات در قالب یک فایل متنی است. شاید بپرسید به چه دلیل !؟ شما می توانید از این فایل به عنوان یک Answer File برای نصب Unattended یک DC و راه اندازی AD استفاده کنید.

در نهایت پس از کلیک دکمه Next سرویس Active Directory شروع به نصب و پیاده سازی می شود. این عملیات مدتی زمان خواهد برد. پس از پایان عملیات نصب کادری مبنی بر نصب موفقیت آمیز سرویس AD نمایش داده می شود. پس از کلیک دکمه Finish کامپیوتر را راه اندازی مجدد کنید.

پس از ایجاد دامنه و نصب سرویس ADDS حساب کاربری Local Administrator از طرف سیستم به صورت Domain Administrator در خواهد آمد. مواقعی پس از Logon ممکن است سیستم از شما بخواهد تا کلمه عبور خود را تغییر دهید.
نصب-Active-Directory-بر-روی-2008-1

وارد مسیر Start> Administrative Tools> Server Manager شده و Roles را انتخاب کنید. در صفحه Roles Summery خواهید دید که سرویس ADDS و DNS بر روی سیستم نصب شده است.


  • 0

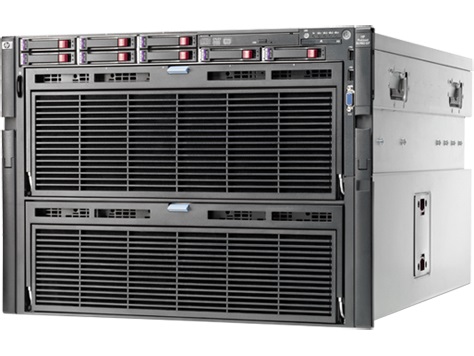
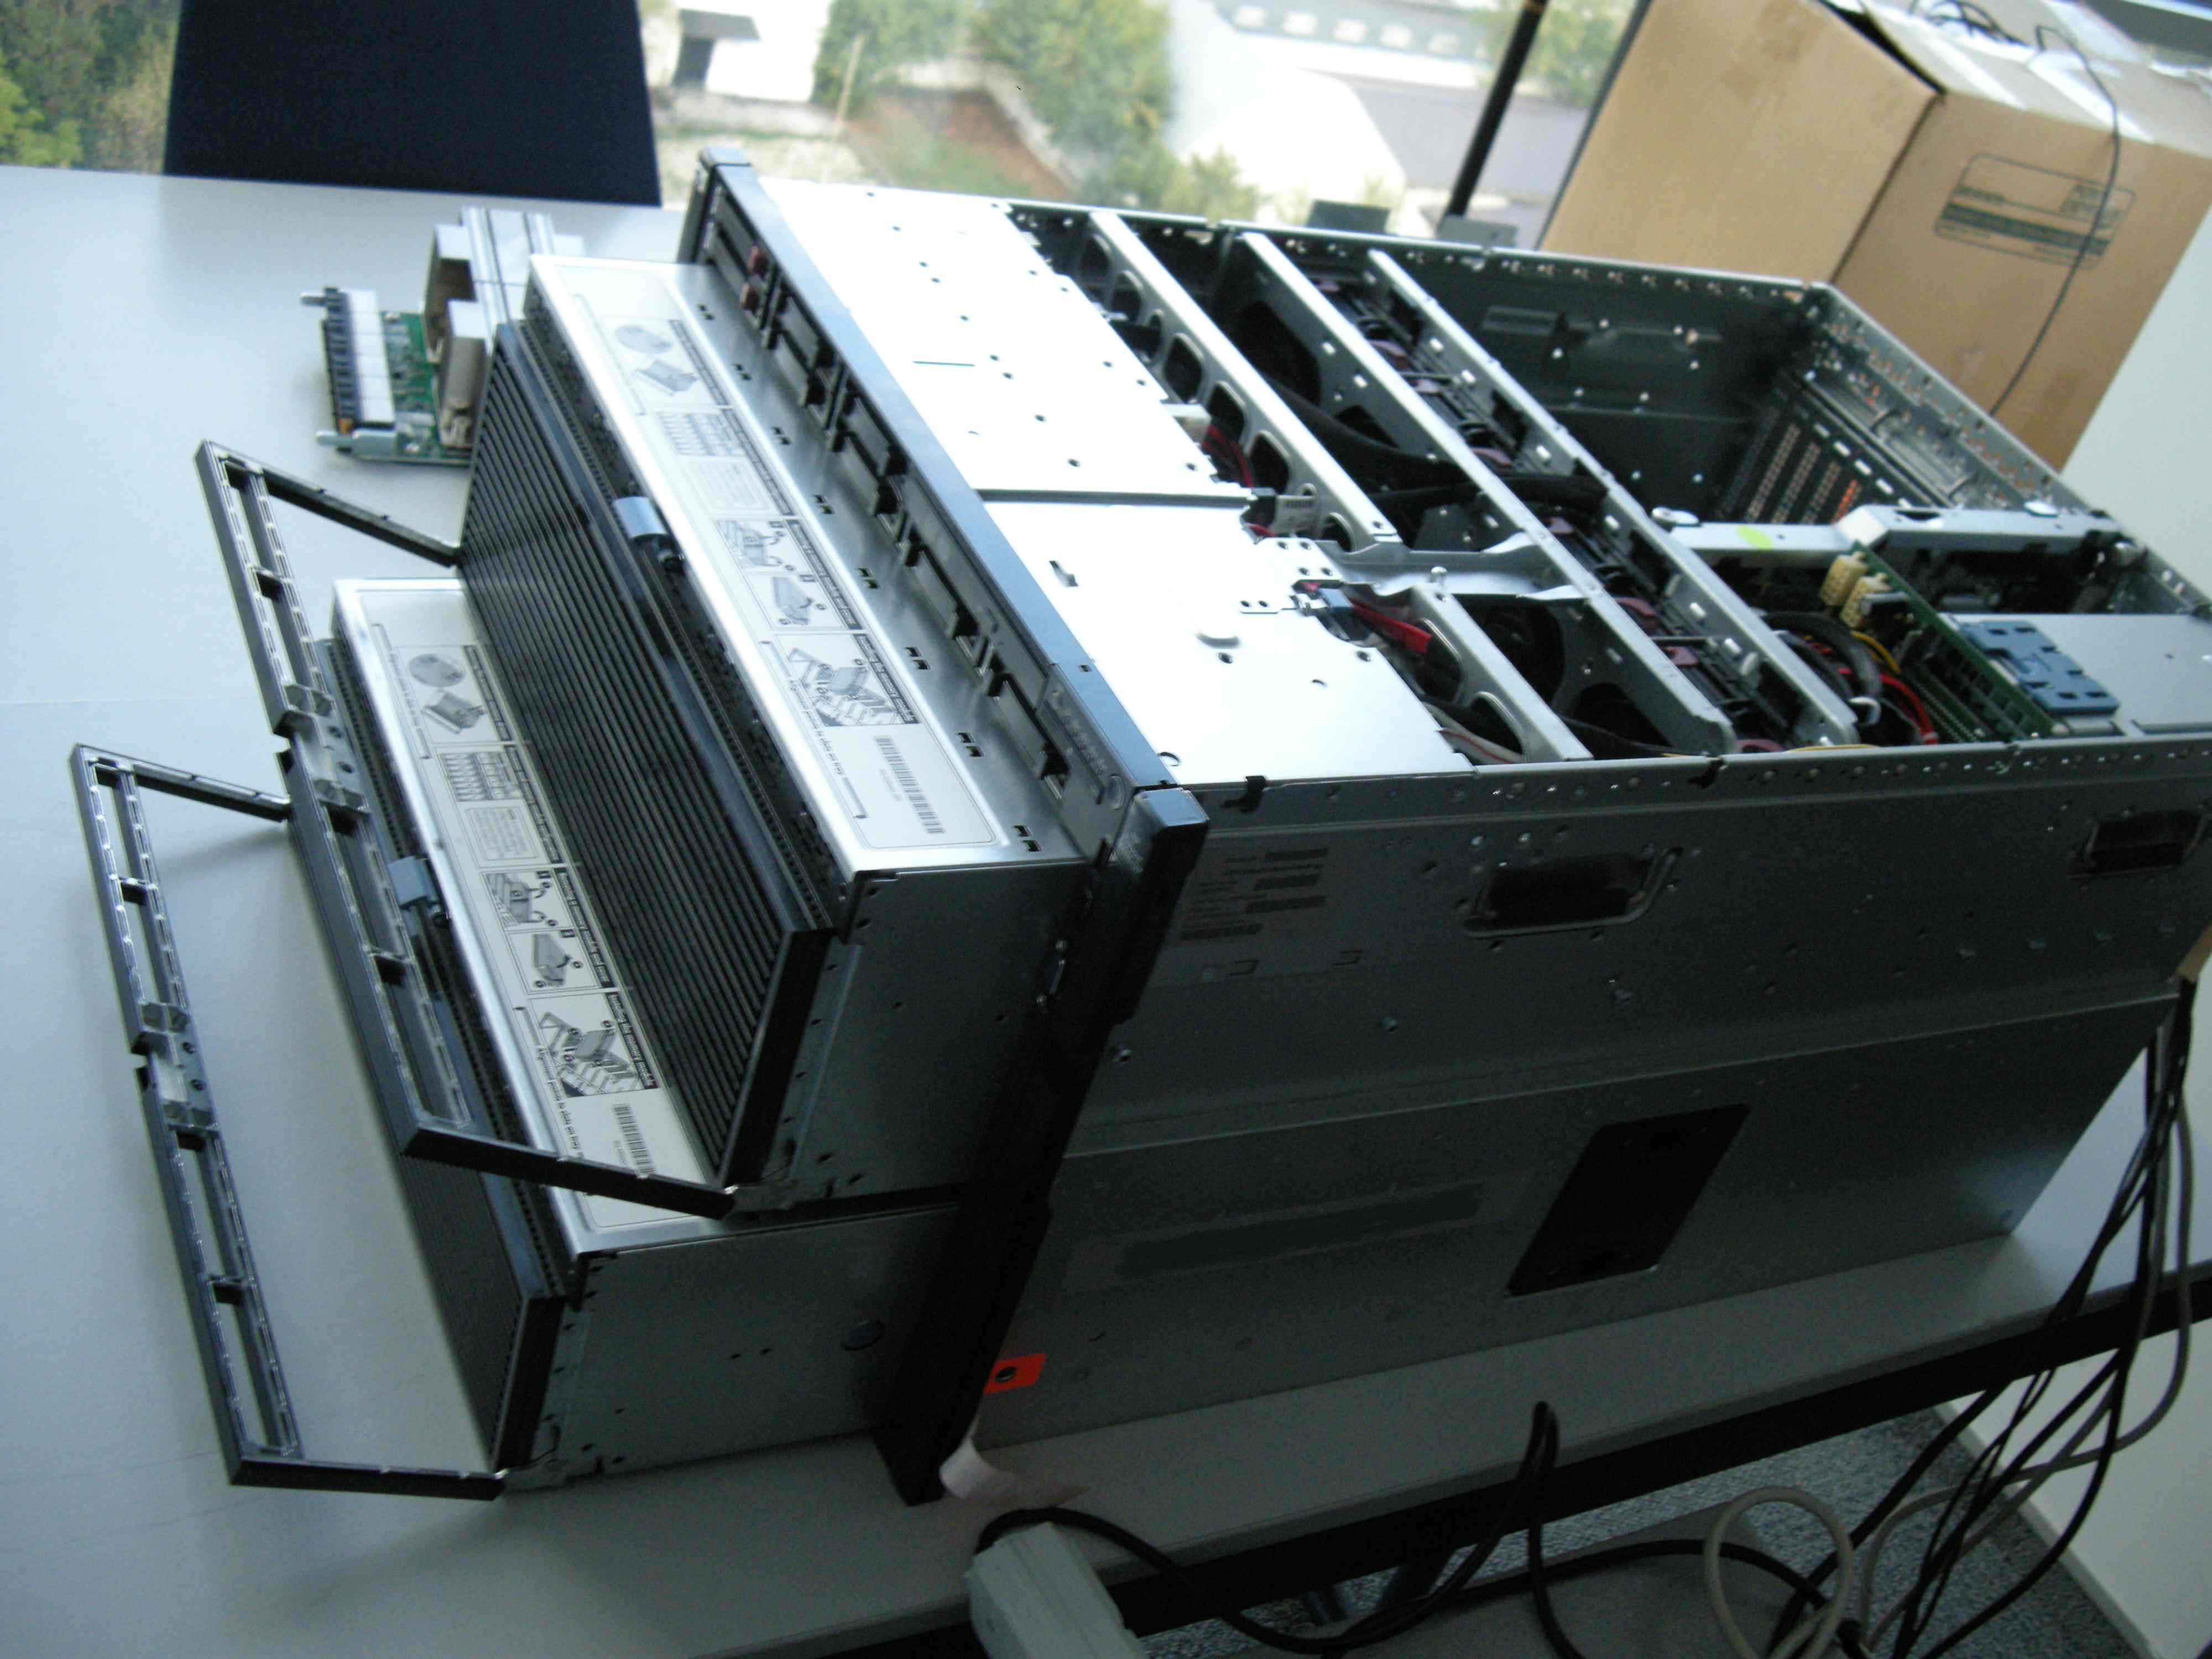
سرور HP Proliant DL980 G7

قیمت-سرور-HP-DL980-G7-خرید


HP ProLiant DL980 Generation 7 (G7)

HP ProLiant DL980 G7 with HP PREMA Architecture is an eight socket server built to handle the largest x86 enterprise environments with confidence. The DL980 G7 blends industry standard economies with advanced mission critical capabilities to deliver balanced scaling, self healing resiliency and breakthrough efficiencies needed in essential enterprise compute environments. Whether housing a single very large data intensive workload, or many consolidated or virtualized workloads to improve resource utilization, the DL980 G7 featuring HP PREMA Architecture with Smart CPU caching and a resilient system fabric, is designed to reduce bottlenecks, improve throughput and performance, as well as deliver enhanced reliability not previously available in an x86 environment.


قیمت-سرور-HP-DL980-G7

قیمت-سرور-HP-DL980-G7-فروش

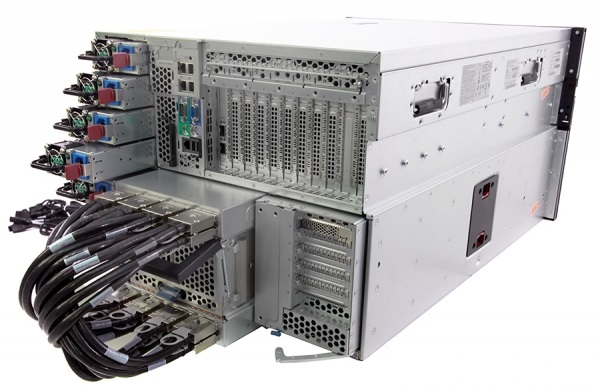
Front View: Rear View:
1. Quick removal access panel 1. Integrated Lights-Out 3 port
2. 8 hot plug redundant fans standard on all models, upper four fan positions shown, lower four not shown 2. Mouse port
3. DVD drive bay 3. Serial port
4. Front panel LED display and Power button 4. Gigabit NIC port
5. Slide-out System Insight Display 5. Gigabit NIC port
6. Two front accessible USB 2.0 ports 6. Gigabit NIC port
7. One front video port 7. Gigabit NIC port
8. Quick release lever for fast server access 8. Video port
9. Upper and lower front accessible processor and memory drawer 9. Keyboard port
10. Support for up to eight 10-core Intel Xeon processors (4 processors in upper and 4 processors in the lower drawer) 10. Two USB ports
11. Support for up to 8 small form factor (SFF) SAS drives 11. Upper XNC ports
12. Universal tool-less “Snap In” Sliding Rail Solution 12. Up to 5 low profile slots supported
13. Server lifting handles 13. Lower XNC ports
14. 8U rack form factor 14. XNC module
15. Up to 11 full height/full length slots supported 15. Service tool
16. Hot Plug Redundant Power Supplies (4 or 8 depending on the model) 16. Power supplies (4 or 8 depending on the model)

What’s New
  • Support for HP StoreFabric SN1000 16Gb Host Bus Adapters
  • Support for HP Smart Array P421 Controller
  • Support for HP Ethernet 10Gb 2-port 530T Adapter
  • Support for HP 3TB G2 Multi Level Cell PCIe ioDrive2 IO Accelerator
  • Support for HP ProLiant DL980 331i SPI Board based on integrated 331i quad port 1GbE networking controller
  • Support for HP ProLiant NC375i SPI Board based on integrated NC375i quad-port 1GbE networking controller

  • 0

سرور HP ProLiant DL380 Gen9

قیمت-سرور-HP-Proliant-DL380-G9-Server-قطعات-سرور

Bottleneck سرور شما کجاست ؟  فضای ذخیره سازی ، منابع پردازشی و یا ارتقا پذیری 
سرور HP Proliant DL380 G9 که پر فروش ترین سرور دنیا می باشد نسل به نسل بهتر می شود. این سرور بالاترین Performance و ارتقا پذیری ممکن را در سرور های دو یونیتی دو پردازنده ای HP دارد. قابل اعتماد بودن و دسترسی بالای این دستگاه قابلیت راه اندازی سرویس های شبکه را در بالاترین Level را میسر می کند. این سرور یکی از بهترین گزینه برای محیط دیتاسنتر های امروزی می باشد. 
سرور DL380 G9 جوری طراحی شده است تا بتواند هزینه ها و پیچیدگیهای شبکه را کاهش دهد و همچنین با استفاده از پردازنده های Intel E5-2600 V3 کارایی تا 70 درصد را ارائه می دهد.
این دستگاه با استفاده از تکنولوژی جدید DDR4 SmartMemory می تواند تا 1.5 تربایت حافظه RAM را ساپورت کند و از لحاظ کارایی نیز نسبت به نسل قبلی آن 14 درصد افزایش یافته است.
در حوزه ارتباط با استوریج داخلی این ارتباط به 12Gb/s SAS رسیده است.
سرور DL380 G9 قابلیت پشتیبانی از 40 گیگابیت بر ثانیه شبکه و انواع کارت های گرافیکی حرفه ای را دارند.
همانطور که می دانید سرور های HP در سازمانهایی که سرویس های مکانیزه و اتوماتیک دارند مورد استفاده قرار می گیرند و کلیه عملیات Update – Deploy – Monitor – Maintain را به سادگی تمام انجام می گیرند. 

تغییرات کلیدی

  • HP NVMe PCIe SSDs پشتیبانی تا 1.6 ترابایت
  •  Intel and NVIDIA GPUs های جدید
  • مدیریت حرفه ای سرور های رکمونت HP G9 با نرم افزار HP OneView که باعث سادگی و کاهش پیچیدگیهای مدیریتی

نرم افزار HP OneView 2.0

ویژگیها

طراحی بسیار قابل انعطاف این دستگاه کلیه نیاز های شما در آینده را فراهم خواهد ساخت.

شاسی دستگاه HP Proliant DL380 G9 بازطراحی شده است و قابلیت پشتیبانی از 8 تا 24 هارد SFF و تعداد 4 تا 12 هارد LFF را دارند.


The redesigned HP Flexible Smart Array and HP Smart SAS HBA Controllers allow you the flexibility to choose the optimal 12 Gb/s controller most suited to your environment. In conjunction with the embedded SATA HP Dynamic Smart Array B140i Controller for boot, data and media needs.

You have a choice of embedded 4x1GbE, HP FlexibleLOM or PCIe standup 1GbE to 40GbE Adapters provide you flexibility of networking bandwidth and fabric so you can adapt and grow to changing business needs.

World-class Performance and Industry-leading Energy Efficiency

The HP ProLiant DL380 Gen9 Server supports industry standard Intel® Xeon® E5-2600 v3 processors with up to 18 cores, 12G SAS and 1.5 TB of HP DDR4 Smart Memory. 3
High efficiency redundant HP Flexible Slot Power Supplies provide up to 96% efficiency (Titanium), HP Flexible Slot Battery Backup module and support for the HP Power Discovery Services offering.
ENERGY STAR® qualified server configurations illustrate a continued commitment to helping customers conserve energy and save money.
Improved ambient temperature standards with HP Extended Ambient Operating Support (ASHRAE A3 and A4) and optional performance heatsinks help to reduce cooling costs. 4
Enhanced performance with active and passive, double-wide GPU support for workload acceleration.

Agile Infrastructure Management for Accelerating IT Service Delivery

With HP ProLiant DL380 Gen9 Server, HP OneView provides infrastructure management for automation simplicity across servers, storage and networking.
Online personalized dashboard for converged infrastructure health monitoring and support management with HP Insight Online.
Configure in Unified Extensible Firmware Interface (UEFI) boot mode, provision local and remote with Intelligent Provisioning and Scripting Toolkits.
Embedded management to deploy, monitor and support your server remotely, out of band with HP iLO.
Optimize firmware and driver updates and reduce downtime with HP Smart Update, consisting of HP SUM (Smart Update Manager) and SPP (Service Pack for ProLiant).

Industry Leading Serviceability

The HP ProLiant DL380 Gen9 Server comes with a complete set of HP Technology Services, delivering confidence, reducing risk and helping customers realize agility and stability. HP provides consulting to transform your infrastructure; services to deploy, migrate and support your new ProLiant Servers.
HP provides consulting advice to transform and modernize your infrastructure; services to deploy, migrate and support your new ProLiant servers and education to help you succeed quickly. 

System features

Processor family
Intel® Xeon® E5-2600 v3 product family
Number of processors
  • 1 or 2
Processor core available
18 or 16 or 14 or 12 or 10 or 8 or 6 or 4
Form factor (fully configured)
2U
Power supply type
(2) Flex Slot
Expansion slots
  • (6) Maximum – For detail descriptions reference the QuickSpec

Memory

Memory, maximum
  • 1.5TB
Memory slots
  • 24 DIMM slots
Memory type
  • DDR4 SmartMemory

Storage

Drive description
  • ((4) or (12)) LFF SAS/SATA/SSD
  • ((8), (10), (16), (18) or (24)) SFF SAS/SATA/SSD
  • (2) SFF Rear drive optional or
  • (3) LFF Rear drive optional
  • NVMe support via Express Bay will limit max drive capacity

Controller Cards

Network controller
  • 1Gb 331i Ethernet Adapter 4 Ports per controller and/or
  • Optional FlexibleLOM
  • Depending on model
Storage controller
  • (1) Dynamic Smart Array B140i and/or
  • (1) Smart Array P440
  • (1) Smart Array P840
  • Depending on model

Server management

Infrastructure management
iLO Management (standard), Intelligent Provisioning (standard), iLO Advanced (optional), HP Insight Control (optional)

What’s included

Warranty
  • 3/3/3 – Server Warranty includes three years of parts, three years of labor, three years of onsite support coverage. Additional information regarding worldwide limited warranty and technical support is available at:http://h18004.www1.hp.com/products/servers/platforms/warranty/index.html Additional HP support and service coverage for your product can be purchased locally. For information on availability of service upgrades and the cost for these service upgrades, refer to the HP website athttp://www.hp.com/support

  • 0

نرم افزار HP OneView

HP OneView

HP OneView

The HP OneView appliance provides software-defined resources, such as groups and server profiles, enabling you to capture the best practices of your experts across a variety of disciplines, including networking, storage, hardware configuration, operating system build, and configuration. By having your experts define the server profiles and the networking groups and resources, you can reduce cross-silo disconnects. System administrators can provision and manage thousands of servers without requiring that your experts be involved with every server deployment.


What is slowing your data center management? Too many process steps? Non-standard, manual tasks? Over-committed experts? An ever-expanding project backlog? HP OneView is powerful converged management that reduces infrastructure complexity with automation simplicity. Its software-defined approach can help your IT teams capture their best practices for “get it right” repeatability every time.The open ecosystem of HP OneView allows easy integration with other management products, including HP, VMware, Microsoft, and Red Hat solutions. HP OneView automates the delivery and operations of IT services, transforming everyday management of server, storage and network resources in physical and virtual environments.

This innovative platform reduces OpEx and improves agility to free your resources to focus on new business initiatives. HP OneView supports lights-out automation and provides a simple, fast, and efficient path to Infrastructure-as-a-Service and to get you to hybrid cloud.

What’s new

  • HP OneView server profile templates let you define configurations once, in minutes, and then provision or update the configuration many times – consistently and reliably.
  • Snapshot for 3PAR StoreServ volumes to save and revert to an earlier point in time or to create a volume clone.
  • Proactively identify SAN health issues where the expected and actual connectivity and states differ.
  • HP Virtual Connect supports Quality of Service and Dual-Hop FCoE.
  • HP OneView provides server profile mobility across different adapters, different generations and different blade models.
  • The HP Virtualization Performance Viewer for HP OneView helps you monitor and quickly troubleshoot performance issues, optimize physical and virtual compute, and forecast required capacity.

Features

Converged Management

HP OneView delivers a unified management platform that supports HP ProLiant Rack servers, HP BladeSystem, HP 3PAR StoreServ Storage, and HP ConvergedSystem 700 platforms.
The innovative HP OneView architecture is designed for converged management across servers, storage, and networks. The unified workspace allows your entire IT team to leverage the ‘one model, one data, one view’ approach. This streamlines activities and communications for consistent productivity.
HP Smart Search provides fast, sophisticated search to instantly find the exact information for which you look. And HP Activities gives you a common communication stream of real-time messages (like alerts, team messages, and updates) to reduce ad hoc processes and team productivity inhibitors.
HP MapView lets you see resource status, relationships and dependencies. Visualizing connections and relationships between resources provides fast collaborative troubleshooting and reduces operational errors.
Dashboard views can be customized to display your preferred data. Standard displays show every device in your data center, from anywhere, with a fully-mobile client. Tasks and alerts are shown, along with more information as needed for more specific areas of interest.

Software-Defined Control

Software-defined approaches are designed into HP OneView to empower your management experts to create resource definitions once (for servers, storage, and networks), and then to roll out new resources — rapidly, repeatedly, and reliably.
Fully-automated SAN zoning, including Brocade fabrics, allows you to attach/detach SAN volumes to server profiles without manual zoning. You can also use direct attach (Flat SAN) profiles between HP Virtual Connect and 3PAR StoreServ Storage.
Network management using HP Virtual Connect supports Fibre Channel and FlexFabric interconnects with other advanced features to enhance productivity. A new migration tool helps transition existing users to HP OneView. MapView allows viewing of some typical switches in non-Virtual Connect networks.
Server profile support for HP ProLiant Blade and Rack Servers (now with Gen9 support) automates firmware maintenance, boosts productivity, and saves time. Software-defined approaches capture your best practices by your experts into common templates and processes for leverage by your wider team.
The state change message bus and REST APIs provide automation and a closed-loop method of providing compliance. This allows virtualization administrators to automate control of HP compute, storage, and networking resources without detailed knowledge of each device.

Automated in Your Environment

The open ecosystem of HP OneView provides easy integration with enterprise software solutions and with custom user solutions. Standard integrations are provided for HP Software, VMware, Microsoft, and Red Hat. Python and Powershell scripts are available to help custom integrations.
HP Operations Analytics for HP OneView is an optional capability that provides ‘Big Data’ analytics for IT operations. You can troubleshoot your converged infrastructure, view the overall data center health, and predict your infrastructure capacity limits.
HP OneView provides standard integrations for VMware vCenter Server, Operations Manager, and Log Insight. Server-profile-based deployment and cluster expansion can create and grow clusters using automated workflows which leverage 3PAR shared storage and/or boot from SAN.
HP OneView for Microsoft System Center is a standard integration that enables server-profile-based deployment and Hyper-V cluster expansion, cluster views, and Fibre Channel / FCoE information. Clear relationships are also shown for health monitoring and alerting.
Full programmability allows users to easily integrate, automate, and customize HP OneView for their own use. The REST APIs, consistent data model, and state-change message bus allow control over management functions and pulling of custom data– and its use as an intelligent automation hub.


  • 0

استوریج QNAP TVS-1271U-RP NAS

The QNAP TVS-1271U-RP is a 4th generation NAS storage solution designed for data backup, file synchronization, and remote access. Ideal for SMB use cases, it also features cross-platform file sharing, a wide-range of backup solutions, iSCSI and virtualization scenarios, as well as all kinds of practical business functions. The QNAP also includes abundant multimedia applications and a wide selection of different component options, all backed by impressive hardware specifications. The TVS-1271U-RP is also a highly scalable solution as it can support up to 1,120TB of raw capacity using multiple QNAP RAID expansion enclosures.

The TVS-1271U-RP is compatible with SATA 6Gbps drives, with QNAP quoting their NAS to deliver over 3,300MB/s in throughput and 162,000 IOPS. QNAP has also powered their TVS-1271U-RP with an Intel Haswell processor, including Pentium, Core i3, Core i5 and Core i7 options, which gives users the flexibly build their NAS based on individual needs. QNAP indicates that this will help to improve the efficiency of CPU-consuming tasks while serving more simultaneous tasks at once. To help boost IOPS performance, the TVS-1271U-RP supports two on-board internal cache ports, which can be equipped with the optional mSATA flash modules. In addition, QNAP offers an internal cache port design that will not use the space of a hard drive tray, which further increases the storage capacity of the TVS-1271U-RP.

Like all QNAP NAS solutions, TVS-1271U-RP is managed by the QTS intuitive user interface. Leveraging the latest version 4.2, this intelligent desktop allows for easy navigation and a ton of new features and enhancements. Users can also create desktop shortcuts or group shortcuts, monitor important system information in real-time, and open multiple application windows to run multiple tasks concurrently.

QNAP TVS-1271U-RP Specifications

  • Form Factor: 2U, Rackmount
  • Flash Memory: 512MB DOM
  • Internal Cache Port: Two mSATA port on board for read caching
  • Hard Drive: 12 x 3.5-inch SATA 6Gb/s, SATA 3Gb/s hard drive or 2.5-inch SATA, SSD hard drive
  • Hard Disk Tray: 12 x hot-swappable and lockable tray
  • LAN Port: 4 x Gigabit RJ-45 Ethernet port
  • (Expandable up to 8 x 1 Gb LAN or 4 x 10 Gb + 4 x 1 Gb LAN by installing optional dual-port 10 Gb and 1 Gb network card)
  • LED Indicators: Status, 10 GbE, LAN, storage expansion port status
  • USB/eSATA:
    • 4x USB 3.0 port (rear)
    • 4x USB 2.0 port (rear)
  • Support: USB printer, pen drive, USB hub, and USB UPS etc.
  • HDMI: 1
  • Buttons: Power button and reset button
  • Alarm Buzzer: System warning
  • Dimensions:
    • 89(H) x 482(W) x 534(D) mm
    • 3.5(H) x 18.98(W) x 21.02(D) inch
  • Weight:
    • 16.14 kg/ 35.58 lb (Net)
    • 18.98 kg/ 41.84 lb (Gross)
  • Sound Level (dB):
    • Sound pressure (LpAm) (by stander positions): 45.0 dB
    • (with 12 x HITACHI HUS724020ALA640 hard drive installed)
  • Power Consumption (W)
    • HDD Standby:
      • TVS-1271U-RP-PT-4G: 88.88
      • TVS-1271U-RP-i3-8G: 87.89
      • TVS-1271U-RP-i5-16G: 88.91
      • TVS-1271U-RP-i7-32G: 89.82
    • In Operation:
      • TVS-1271U-RP-PT-4G: 173.38
      • TVS-1271U-RP-i3-8G: 176.27
      • TVS-1271U-RP-i5-16G: 174.64
      • TVS-1271U-RP-i7-32G: 176.42
      • (with 12 x WD WD20EFRX hard drive installed)
  • Temperature: 0~40˚C
  • Relative Humidity: 5~95% non-condensing, wet bulb: 27˚C.
  • Power Supply
    • Input: 100-240V~, 50-60Hz, 7A-3.5A
    • Output: 500W
  • PCIe Slot: 2 (1* PCIe Gen3 x8, 1* PCIe Gen3 x4)
  • Fan: 3 x 7 cm smart cooling fan

Design and Build

Like all QNAP NAS solutions, the TVS- 1271U-RP has a fairly basic design with its all-metal chassis. There’s not too much to say about the front panel, as the vast majority of space is taken up by the 12 drive-bays (12 x 3.5-inch SATA 6Gb/s, SATA 3Gb/s hard drive or 2.5-inch SATA, SSD hard drives). To the far right is the power button and the Status, 10 GbE, LAN, storage expansion port status indicators.

Turning it around to the back panel shows a host of connection functionality and other features. On the front and center are the eight USB ports, four of which are 2.0 while the remaining four are 3.0. Just to the left is a tiny Password & Network Settings Reset Button while above are the four Gigabit LAN ports. An HDMI port is also located near the group with two redundant power supplies on the far right.

In addition, two expansion slots are visible (when not occupised with a 10G expansion card), allowing the unit to expand up to 1,120TB in raw capacity using a total of 140 hard drives with 8 expansion units. This is ideal for growing businesses and those that leverage a ton of data every day, such as with video surveillance, data archiving, TV broadcast storage, and other large-data applications.

The TVS- 1271U-RP supports the ANSI/EIA-RS-310-D rack mounting standards.

Testing Background and Comparables

We publish an inventory of our lab environment, an overview of the lab’s networking capabilities, and other details about our testing protocols so that administrators and those responsible for equipment acquisition can fairly gauge the conditions under which we have achieved the published results. None of our reviews are paid for or overseen by the manufacturer of equipment we are testing.

We tested the QNAP TVS-1271U-RP with the following drives in iSCSI block-level and CIFS file-level tests:

Application Performance Analysis

Our first benchmark of the QNAP TVS-1271U-RP is our Microsoft SQL Server OLTP Benchmark that simulates application workloads similar to those the QNAP TVS-1271U-RP and its comparables are designed to serve. For our application testing we are only looking at the Toshiba HK3R2 SSDs.

StorageReview’s Microsoft SQL Server OLTP testing protocol employs the current draft of the Transaction Processing Performance Council’s Benchmark C (TPC-C), an online transaction processing benchmark that simulates the activities found in complex application environments. The TPC-C benchmark comes closer than synthetic performance benchmarks to gauging the performance strengths and bottlenecks of storage infrastructure in database environments. Our SQL Server protocol uses a 685GB (3,000 scale) SQL Server database and measures the transactional performance and latency under a load of 15,000 virtual users.

Looking at the TPS performance for each VM, all were configured identically and performed well, with little disparity between them. The average overall performance was found to be 2,894 TPS. The difference between the he top performer, VM2 at 2,912.6 TPS, and the lowest performer, VM4 at 2,876.8 TPS, was 35.8 TPS.

When looking at average latency of the same test, results were mirrored; however, there was a bit more disparity between the configurations. The average was set at 441.0ms. The top performer, VM2 with a latency of 409.0ms, was only 62ms lower than the highest latency VM, VM4, with 471.0ms.

Our next set of benchmarks is the Sysbench test, which measures average TPS (Transactions Per Second), average latency, as well as average 99th percentile latency at a peak load of 32 threads.

In the average transactions per second benchmark, the TVS-1271U-RP gave us a performance of 2,047 TPS aggregate performance.

In average latency, we measured 64ms across all 4 VMs, with the spread being from 55ms at the lowest to 77ms at the highest, a difference of 22ms.

In terms of our worst-case MySQL latency scenario (99th percentile latency), the QNAP measured 327ms averaging all four 4 VMs.

Enterprise Synthetic Workload Analysis

Our Enterprise Synthetic Workload Analysis includes four profiles based on real-world tasks. These profiles have been developed to make it easier to compare to our past benchmarks as well as widely-published values such as max 4k read and write speed and 8k 70/30, which is commonly used for enterprise systems.

  • 4k
    • 100% Read or 100% Write
    • 100% 4k
  • 8K (Sequential)
    • 100% Read or 100% Write
  • 8k 70/30
    • 70% Read, 30% Write
    • 100% 8k
  • 128k (Sequential)
    • 100% Read or 100% Write

In the first of our enterprise workloads, we measured a long sample of random 4k performance with 100% write and 100% read activity to attain results from for this benchmark. In this scenario, the QNAP populated with SSDs recorded 135,464 IOPS read and 70,246 IOPS write when configured in iSCSI while CIFS connectivity saw just 22,588 IOPS read and 61,433 IOPS write. For comparison, the HDD configuration posted 10,524 IOPS and 4,788 IOPS (read and write, respectively) when configured in iSCSI.

As expected, the average latency benchmark results were much closer in performance. Here, the QNAP populated with SSDs posted an impressive 1.89ms read and 3.64ms write (iSCSI), whereas the HDD configuration posted 24.31ms read and 53.49ms write (iSCSI). As shown in our chart below, there was a large read latency spike when the HDDs were configured in CIFS (398.46ms).

Looking at results of the max latency benchmark the QNAP NAS populated with SSDs showed the best read performance (71.8ms/CIFS); however, it showed a huge spike in writes with 6,673.4ms. The best configuration for maximum latency in writes was the QNAP populated with HDDs using CIFS.

The SSD configurations in both iSCSI and CIFS showed good consistency, with 1.66ms read and 5.15ms write in iSCSI and 9.22ms read and 22.49ms write in CIFS. As far as the HDD configurations of the QNAP NAS go, our iSCSI block-level protocol showed the best standard deviation read latency while CIFS showed the best writes.

Our next benchmark measures 100% 8K sequential throughput with a 16T/16Q load in 100% read and 100% write operations. Here, the performance of all drives improved substantially, with the QNAP NAS configured in HDDs via CIFS showed the top read activity by a noticeable margin (158,454 IOPS). The QNAP NAS configured in iSCSI posted the top write performance (135,251 IOPS).

Compared to the fixed 16 thread, 16 queue max workload we performed in the 100% 4k write test, our mixed workload profiles scale the performance across a wide range of thread/queue combinations. In these tests, we span workload intensity from 2 threads and 2 queue up to 16 threads and 16 queue. The SSDs configured in iSCSI via the QNAP NAS posted the highest results; however, the iSCSI protocol had the least consistent results (though it reached the 80K IOPS mark). The QNAP HDD configurations had substantially lower IOPS, particularly in our CIFS file-level test.

Results were mirrored when looking at average latency, though the QNAP configured in with SSDs had much more stables results in iSCSI. The HDDs configured in iSCSI also outperformed CIFS for this benchmark, which had significant latency spikes.

Performance was a much more erratic overall from all of the QNAP NAS configurations tested in our max latency benchmark though iSCSI and CIFS were more in line with each other than in previous benchmarks. Overall, the QNAP NAS configured with SSDs in iSCSI showed the best max latency results.

The results of the standard deviation benchmark were virtually identical to the results of the average latency benchmark, with iSCSI outperforming CIFS in both HDD and SSD configurations.

Our last test in the Enterprise Synthetic Workload benchmarks looks at 128k large block sequential performance, which shows the highest sequential transfer speed the QNAP drive configurations. Looking at the 128k performance of 100% write and 100% read activity, all drives and configurations posted similar write numbers, all of which boasted near 2,200,00KB/s mark in writes. The QNAP NAS populated with SSDs and configured in iSCSI had the best read and write performance with 2,304,102KB/s and 2,285,056KB/s, respectively.

Conclusion

One of biggest assets of the QNAP TVS-1271U-RP is its ability to scale as businesses grow combined with ease of use. With a massive storage pool of to 1,120TB in raw capacity via multiple QNAP RAID expansion enclosures, the TVS-1271U-RP is able to satisfy almost any needs. On the hardware side, TVS-1271U-RP is able to leverage SATA 6Gbps drives, which provides a good combination of deployment options with affordable storage media. QNAP ships the TVS-1271U-RP with an Intel Haswell processor, which is available in Pentium, Core i3, Core i5 and Core i7 options. Coupling all of this with the integrated QTS management interface allows the TVS-1271U-RP NAS boast a mountain of flexibility and thus ideal for a wide variety of applications.

We tested the NAS with both HDDs and SSDs. We saw upwards of 135,464 IOPS read and 70,246 IOPS write in throughput performances, as well as and average latencies as low as 1.89ms read and 3.64ms write (both leveraging an iSCSI configuration using HK3R2 SSDs). In our 8K sequential benchmark we saw throughput performance of 158,454 IOPS read with the Seagate NAS HDD (CIFS) while the HK3R2 SSD gave us a write performance of 135,251 IOPS (iSCSI). Our HDD 128k large block sequential performance boasted impressive speeds, all of which all surpassed the 2.2GB/s as far as writes go, although SSD performance didn’t come out as well. The QNAP populated with SSDs offers strong mixed workload performance, but CIFS read measurements dropped far below its HDD counterpart, measuring 230MB/s.

Pros

  • Good scalability
  • SATA support offers lower cost drives
  • Easy to configure and deploy

Cons

  • Application performance wasn’t as strong as synthetic workloads
  • Poor SSD iSCSI write performance in synthetic benchmarks

Bottom Line

The QNAP TVS-1271U-RP is a flexible SMB NAS that can cost-effectively scale as business needs grow.


  • 0

دوره آموزشی HP APS Server

دوره آموزشی HP APS Server

نام دوره: Servicing HP Proliant APS ML/DL/SL Servers

مدت دوره: 40 ساعت 

HP-Servicing-Proliant-ML-DL-SL-Servers-دوره-آموزشی-سرور

سیلابس دوره آموزشی

Module 1: Configuring ProLiant Server and Array Hardware
Objectives
Firmware upgrade process
Configuring HP ProLiant server
DDR3 memory specifications and configuration rules
Configuring storage subsystem
Learning check
Module 2: Installing Server Support Software
Objectives
HP Insight Control management suites
SmartStart
ProLiant Support Pack
Validating and testing the solution
Setup differences for 100-series ProLiant servers
Learning check
Module 3: Use and Maintain Integrated Lights-Out Products
Objectives
HP Lights-Out technology and benefits
Functions of iLO3 Management processor
Functions of iLO2 Management processor
Learning check
Module 4: Storage Solutions for ProLiant Servers
Objectives
Storage technologies
HP disk drives
HP ProLiant Array controllers
Storage solutions
Learning check
Module 5: Data Availability and Protection for a ProLiant Server
Objectives
Increasing availability through power protection
Rack options
Memory protection technologies
Disk Backup System
Learning check
Module 6: Troubleshooting ProLiant Motherboards
Objectives
Server Boot process
Boot process failure indicators
Troubleshooting reboot problems
Learning check

 ثبت نام دوره آموزشی امنیت CEH


  • 0

بوت کردن سرور HP با فلش حاوی HP Smartstart

با توجه به اینکه درخواستهای بسیار زیادی از دوستان برای قرار دادن این پست شده بود تیم فنی و مهندسی وی سنتر تصمیم به قرار دادن این پست گرفت.

امیدواریم از این پست لذت ببرید.

Had long wanted to put this post, simplon thing as above, but many times we find (by saving issues) HP servers without CD, so before installing the operating system need to update the firmware on all components of the server with the HP Firmware Maintenance CD and later with the HP SmartStart CD prepare boot, install utilities and drivers from HP on the machine. In the case of not having a CD server can with an HP utility dump them to an external USB or flash drive.

The tool is called HP USB Key Utility, you can download from the official website HP. After downloading can install or remove it to run directly.

With this tool you can transfer images from CD-ROM or DVD-ROM drive to USB (pendrive).

We note that the minimum version is the 7.50 for both HP SmartStart CD cómo HP Firmware Maintenance CD.

Simply select CD / DVD USB drive origin and destination indicate!

From version 1.5 HP USB tool and can combine Smart Start and Maintenance firmaware and even several smart start x86 and x64 in one pendrive. Besides that must be the latest versions of Smart Start and Firmware Maintenance for these combinations.


نصب و راه اندازی HP BladeSystem

In this paper we see a system of servers already quite common in any environment more or less nice, not go into the issue of whether it is better for some environments or other, or if it is more convenient, simple, spend less… see an environment based on HP blades, this is a HP BladeSystem, any particular model and see all the settings that can be done from your OA, HP Onboard Administrator, will be the management console all the chassis, the ‘irons’, from this console can manage any component / element, and view its status at all times.

So by way of introduction, this is what would be a blade system, that is a drawer where we put depending on the model 8 blades, 16… all in itself would be redundancy and compact, since it does not occupy the same 16 servers in a rack format 16 blades. We have so many power supplies as we need to feed the chassis, not individually, if not comprehensively, and fans to cool the environment. Could set by the sensors depending on the temperature more or less operating at speed, and power sources and depends on our environment we ride up the blades could be turned off if not needed (for example a VMware), with all that we can save a lot $$$ into electricity,air conditioners, physical space / racks,… I can see every blade (server) is in a bay, each server operating system would, totally independent of other blades (or not), we have a small display to view the status of all the chassis and to set some parameters. In the back we have the switches, since such servers prevent wiring, and wired ethernet are internal connections, and fiber, all switches are duplicated to prevent falls and have high redundancy. Besides having one or two chassis management devices, that is where we administer the system, from the so-called HP Onboard Administrator. Each HP BladeSystem es different, as well as between different manufacturers (an IBM BladeCenter example), but still the same ‘philosophy’ and are ‘almost’ set equal.

The question is first of all install the chassis (Irons) and then we start setting, for how to mount the bars there everyone who read the official doc if you do not know 😉 since in this document we perform configuration. After connecting the HP Onboard Administrator to switch him or us, we can connect to the default IP with the default username and password (admin / password). By this we understand that the first thing to change would be the IP for which we are interested and admin password. Another way would be from the Insight Display or display that has the chassis front panel, from there we can make basic changes such.

In “Rack overview” A brief summary of our chassis, of the items we have in him, a front and a rear. Come the name of our enclosure, and serial number and part number.

In “Enclosure information” shows the condition of the components, if we aluna warning or everything is OK.
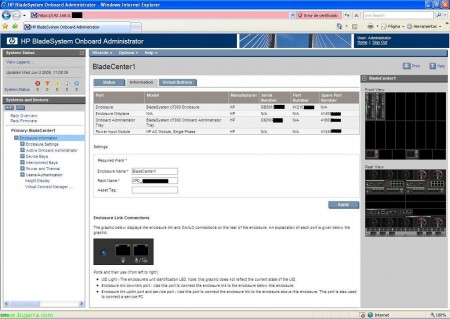
In “Enclosure information, flange “Information” we can change the name of our chassis / BladeSytem / enclosure, or name that owns CPD. Besides the serial ebseñarnos, also indicates a support for chassis connections, UID LED on the identification, the connection port between the chassis rest of our CPD (we make the connection with the BladeSystem continue below) llamado Enclosure link downlink port, Enclosure and also have the uplink port that will link to connect to the upper chassis or to connect a computer if necessary.

In “Enclosure information”, flange “Virtual Buttons” can turn on or off LED Light UID, to indicate any administrator what unit must do their homework.

In “Enclosure information” > “Enclosure Settings”. is a summary of BladeSystem devices and see if we need one to connect / enable and firmware all, we must always consider that we can have the latest firmware and all common elements have the same firmware!

In “Enclosure information” > “Enclosure Settings” > “AlertMail” for that, as the name suggests, to activate email alerts of our chassis.

In “Enclosure information” > “Enclosure Settings” > “Device Power Sequence”, flange “Device Bays”, can enable the lighting of the blades in the chassis with a priority order.

In “Enclosure information” > “Enclosure Settings” > “Device Power Sequence”, flange “Interconnect Bays”, can enable the bays on the chassis connection (switches) with an order of priority.

In “Enclosure information” > “Enclosure Settings” > “Date and Time” to configure the time service of the chassis, be a manual or schedule an NTP time server or.

In “Enclosure information” > “Enclosure Settings” > “Enclosure TCP/IP Settings” is where you can configure the name, IP, netmask, gateway and DNS servers to the chassis, the Onboard Administrator.

In “Enclosure information” > “Enclosure Settings” > “Network Access” flange “Protocols”, are the connection protocols that will qualify to enter the chassis. We have web access with HTTP or HTTPS, seguro shell with SSH, Telnet y XML reply.
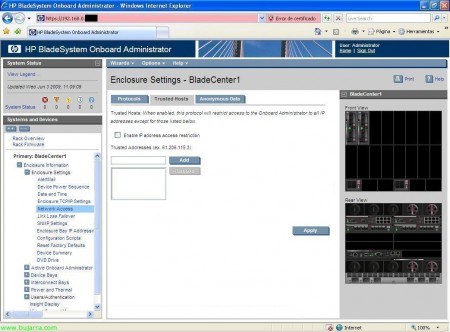
In “Enclosure information” > “Enclosure Settings” > “Network Access” flange “Trusted Hosts” if we enable only give access to the enclosure from these IP’s and not from the entire network.

In “Enclosure information” > “Enclosure Settings” > “Network Access” flange “Anonymous Data” simply if we enable chassis give you some information before it loguearnos, you can sign in to be information that interests us as Darla track 😉

In “Enclosure information” > “Enclosure Settings” > “Link Loss Failover”, if te Devices Onboard Administrator, and want to do that when the primary OA lose connection, al otro pass Onboard Administrator, we enable and indicate what time of seconds that pass without a network connection, primary OA (long as the network has secondary OA!),

In “Enclosure information” > “Enclosure Settings” > “SNMP Settings” in case we have configured our network monotorización system, to manage alerts, ads… Denial Nagios, was x put 😉

In “Enclosure information” > “Enclosure Settings” > “Enclosure Bay IP Adresses”, tab “Device Bays”, we configured the IP’s of the blades, not your operating system, if the iLO IP’s so we could later connect to each bay.

In “Enclosure information” > “Enclosure Settings” > “Enclosure Bay IP Adresses”, tab “Interconnect Bays”, we configured the IP’s of the rear chassis modules, of fiber switches, the ethernet…

In “Enclosure information” > “Enclosure Settings” > “Configuration scripts”, can import the configuration scripts to automate configuration chassis and do it faster, we import it from a file or from a URL.

In “Enclosure information” > “Enclosure Settings” > “Reset Factory Defaults”, because for that, to reset the chassis to the default settings from the factory,

In “Enclosure information” > “Enclosure Settings” > “Device Summary”, is one of the most commonly used screens to document a blade environment, is a summary of all the components that we have in our chassis, with the description, serial, part number, manufacturer, model, spare part number, firmware, hardware version… all, the blades, switches, power, coolers / fans, mezzanines of the blades, info of the chasis…

In “Enclosure information” > “Enclosure Settings” > “DVD Drive”, from here we can connect the CD / DVD of the chassis to a specific blade, case we need to get a CD / DVD on a particular blade. Man, is best done from the iLO connection… but tb is here 😛

In “Enclosure information” > “Active Onboard Administrator” tab “Status e Information”, we see the state of the chassis says, at temperatures of about, and others on our chassis.

In “Enclosure information” > “Active Onboard Administrator” tab “Virtual Buttons”, we have two buttons, one for the chassis completely Resetar, I hope this does not have to do ever, since there is no reason to reboot the entire chassis, or to turn on the LED UID information.

In “Enclosure information” > “Active Onboard Administrator” > “TCP/IP Settings”, is informational, on aand Onboard Administrator, network name information, and other IP data,
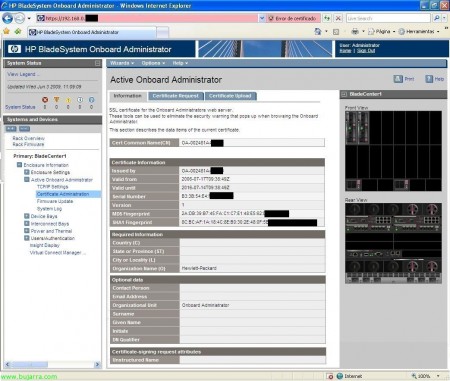
In “Enclosure information” > “Active Onboard Administrator” > “Certificate administration”, tab “Information” we have that, information on the certificate for the SSL web server.

In “Enclosure information” > “Active Onboard Administrator” > “Certificate administration”, tab “Certificate Request”, serve to generate a certificate our, using a self-signed certificate or CSR by power give it to a certificate authority for us to generate one ‘good’. And in the flange “Certificate Upload” I would climb.

In “Enclosure information” > “Active Onboard Administrator” > “Firmware Update”, could update the firmware of our chassis, if we want the, downgrade could make it, can upload it from a file of our team, from a URL or directly from a USB flash drive connected to the chassis.

In “Enclosure information” > “Active Onboard Administrator” > “System Log”, tab “System Log” We have everything that happens in our chassis, a LOG.

In “Enclosure information” > “Active Onboard Administrator” > “System Log”, tab “Log Options” LOG can redirect a server’s LOG’s, to a Kiwi Syslog type.

In “Enclosure information” > “Device Bays” we have all our blades, with their status, if the UID is on or not, bay number, state on / off, iLO IP address, and state of the DVD drive if it is connected or not.

In “Enclosure information” > “Device Bays” > BLADE > flange “Status”, have the information on our blade, if you would have some warning here would tell us what the problem, or if you have a high temperature. Certainly, if we select hardware element, we indicated in the drawing on the right on which device we, helps when we have enough elements or in the theme of the switches.

In “Enclosure information” > “Device Bays” > BLADE > flange “Information”, blade shows information in question, all of it is quite interesting, o a anotar, as the MAC or WWPN…

In “Enclosure information” > “Device Bays” > BLADE > flange “Virtual Devices”, we have different options on our blade power button, and turn it the UID.

In “Enclosure information” > “Device Bays” > BLADE > flange “Boot Options”, select the boot order of the blade, or next boot,

In “Enclosure information” > “Device Bays” > BLADE > flange “Log IML”, o Integrated Management Log, have the log’s of the blade, everything that happens will be recorded.

In “Enclosure information” > “Device Bays” > BLADE > “iLO” flange “Processor Information”, can do remote management of equipment, ideally to remotely control the computer, so we click on “Integrated Remote Console” for control of the team and to manage their devices or if we have it in Java JRE “Remote Console”.

We open in a new window control on remote computer, to do everything we need, mount remote units, connect CD / DVD the remote site, restart, shutdown…

In “Enclosure information” > “Device Bays” > BLADE > “iLO” tab “Event Log”, filtered records have a team at iLO.

In “Enclosure information” > “Device Bays” > BLADE > “Port Mapping”, tab “Graphical View” we can see the internal connections of the blade, This screen is used to understand the inner connection between the blade and the switches we have in our chassis, we can see the blade adapters (Embedded or integrated and Mezzanines) each with its internal ports, are usually additional network cards or HBA’s (fiber) with one or more ports. And each port on each adapter looks at what port or ethernet fiber switch is connected.

In “Enclosure information” > “Device Bays” > BLADE > “Port Mapping”, tab “Table View” have the same information as in the previous tab but different view 😉

In “Enclosure information” > “Interconnect Bays” shows the chassis switches, back, in my case, two swtiches Ethernet and two fiber, shows the state of them, and if you have the power UID, switch type and model, su IP address management.

In “Enclosure information” > “Interconnect Bays”tab “Status” can view the status and diagnostic switch in question, if you have any electrical issues alert, Temperature…
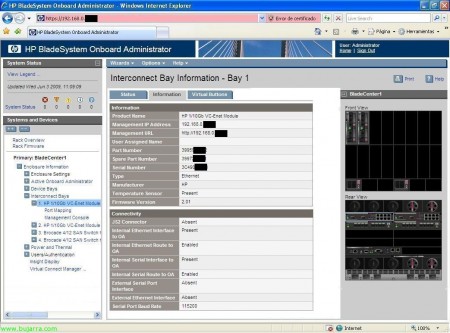
In “Enclosure information” > “Interconnect Bays” > Bay ethernet > tab “Information” see it, information about this device, certain to score in the correct documentation or to arrange a future of trouble,

In “Enclosure information” > “Interconnect Bays” > Bahia ethernet , flange “Virtual Buttons” same as above, is a virtual button to turn off / reboot the device or to turn on the UID if necessary,

In “Enclosure information” > “Interconnect Bays” > Bahia ethernet > “Port Mapping” we can see the blades we have connected to this ethernet switch indicating which mezzanine what blade is what switch port, MAC also shows the device in question, and if a switch would display the WWNN fiber.

In “Enclosure information” > “Interconnect Bays” > Bahia ethernet > “Management Console”, We initiate the switch management console, and would switch level configuration, to set it up the zoninga that interest, through “HP Virtual Connect Manager”,

In “Enclosure information” > “Interconnect Bays” > BAY fiber > tab “Status”, can view the status and diagnostic fiber switch in question, if you have any electrical issues alert, Temperature…

In “Enclosure information” > “Interconnect Bays” > BAY fiber > tab “Information” see it, information about this device, certain to score in the correct documentation or to arrange a future of trouble,

In “Enclosure information” > “Interconnect Bays” > BAY fiber, flange “Virtual Buttons” is the virtual button to turn off / reboot the device or to turn on the UID if necessary,

In “Enclosure information” > “Interconnect Bays” > BAY fiber > “Port Mapping” we can see the blades we have connected to this ethernet switch indicating which mezzanine what blade is what switch port, also shows the connected HBA WWNN, perfect to have everything well documented and annotated for configuration issues paths.

In “Enclosure information” > “Interconnect Bays” > Bahia ethernet > “Management Console”, We initiate the switch management console fiber, and would switch level configuration, to set it up the zoninga that interest, we have a tutorial here on how to configure a switch fiber http://www.bujarra.com/?p=2752,

In “Enclosure information” > “Power and Thermal” see the status of the chassis electrical issue, and su temperature and in case of any mistakes we mark with error.

In “Enclosure information” > “Power and Thermal” > “Power Management” We can manage the configuration of the redundancy on the chassis power, so as to enable “Dynamic Power” for putting cost savings F.A. you do not need a standby state not to use them unless necessary. Note, it sounds a tall tale with this issue of saving or putting virtualization topics such chassis, saving is true, just take a calculator and multiply the servers so you spend so worth the hour kilowatt (kWh) and you can amaze with the costs in one year! all this you must add the cost of air conditioning of course… if we reverse, there is nothing better than a blade virtualization environment.

In “Enclosure information” > “Power and Thermal” > “Enclosure Power Allocation” spending shows us that we need the items currently in the chassis, our blades, switches, modules… and what would be our total capacity. One should always keep in mind that if we damaged a power supply, if we covered!

In “Enclosure information” > “Power and Thermal” > “Power Meter”, tab “Graphical View” shows a graph of our chassis consumption,

In “Enclosure information” > “Power and Thermal” > “Power Meter”, tab “Tablel View” records shows a consumption of our chassis,

In “Enclosure information” > “Power and Thermal” > “Power Subsystem” shows the status of all our power supplies, and the power mode, and if we would have redundancy.

In “Enclosure information” > “Power and Thermal” > “Power Subsystem” > “Power Supply X” will show specific information and a power source in question as its capacity / consumption, serial, part number, spare part number…

In “Enclosure information” > “Power and Thermal” > “Thermal Subsystem” tab “Fan Summary” shows a generic view of the fans or coolers that have our chassis and their use.

In “Enclosure information” > “Power and Thermal” > “Thermal Subsystem” tab “Fan Zones”, shows areas of our chassis ventilation and whether they are covered or not by fans to cool the area, normal is placed behind the blades fans, because it does not make much sense to place them on the other side, sometimes anyway not us who assemble the chassis if not an HP engineer, so not all our decisions 😉

In “Enclosure information” > “Power and Thermal” > “Thermal Subsystem” > “Fan X” and shows the individual status of each fan or cooler, and their use,
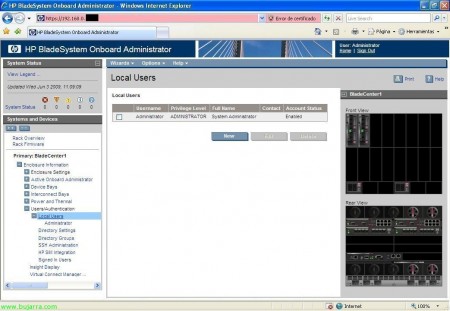
In “Enclosure information” > “Users / Authentication” > “Local Users” we have a local user management on the chassis, manage access to blade environment.

In “Enclosure information” > “Users / Authentication” > “Local Users” > “Directory Settings”, to configure access instead of local users with service users through LDAP Directory,

In “Enclosure information” > “Users / Authentication” > “Local Users” > “Directory Groups” to manage groups of users from LDAP,

In “Enclosure information” > “Users / Authentication” > “Local Users” > “SSH Administration”, manages the keys for SSH,

In “Enclosure information” > “Users / Authentication” > “Local Users” > “HP SIM Integration” > sirve para integrar el Onboard Administrator con HP Systems Insight Manager, to pass credentials.

In “Enclosure information” > “Users / Authentication” > “Local Users” > “Signed in Users” shows the currently logged users on the chassis of blades or historic logins,

In “Enclosure information” > “Insight Display”, shows the small screen that has the front of the chassis, a small display that will enable us to perform certain basic configurations with a couple of buttons, and view the status of the chassis briefly.

Well, the interesting thing is that if we set some of this is well documented, as well as for us to deliver to the customer and who come after us know what and how it is mounted, with logical drawings like this on the connections and documentation of IP’s, MAC’s, WWNN, WWPN, cabling… and perfectly in this structure would blade, more comfortable to manage and maintain! a bargain!!!

آخرین دیدگاه‌ها

    دسته‌ها